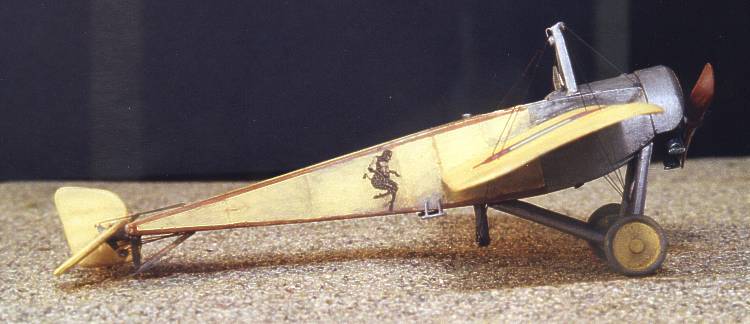
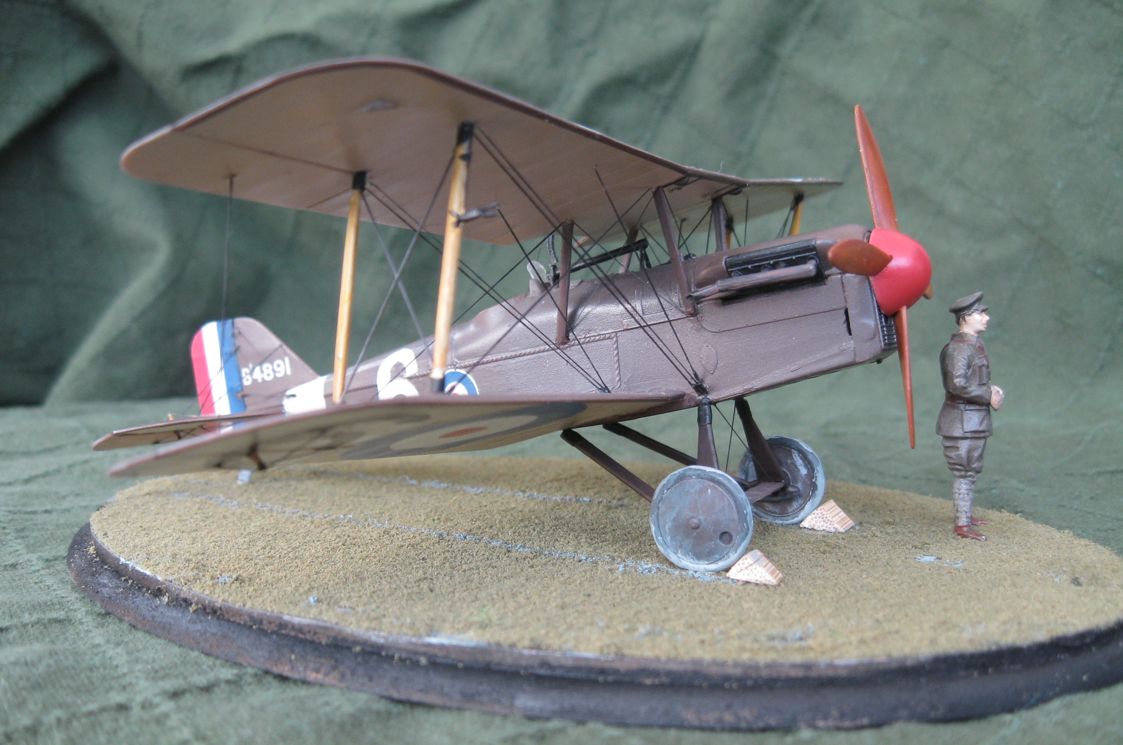
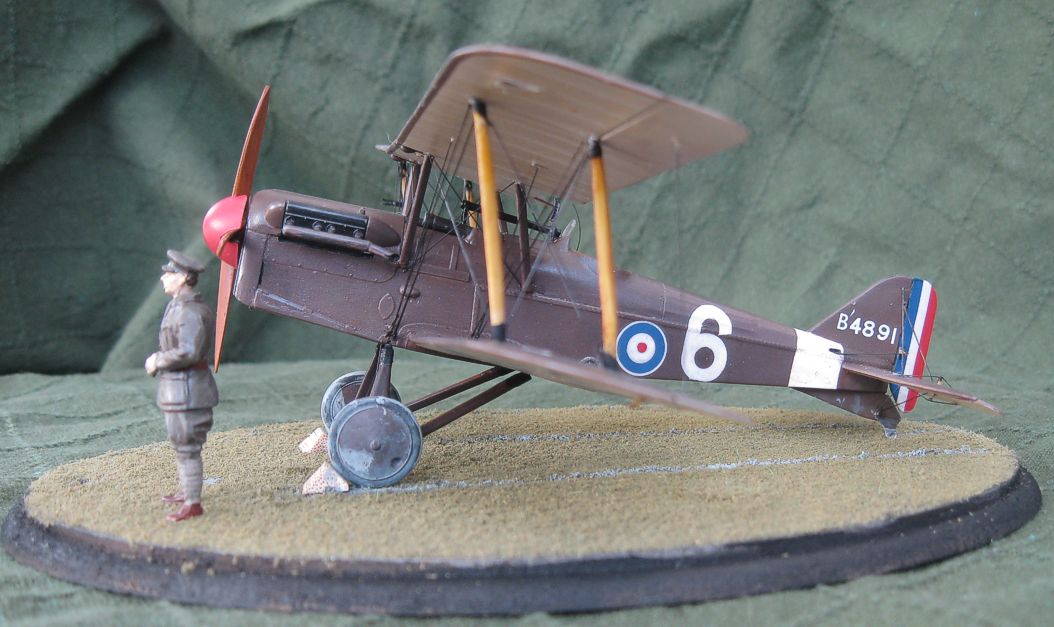
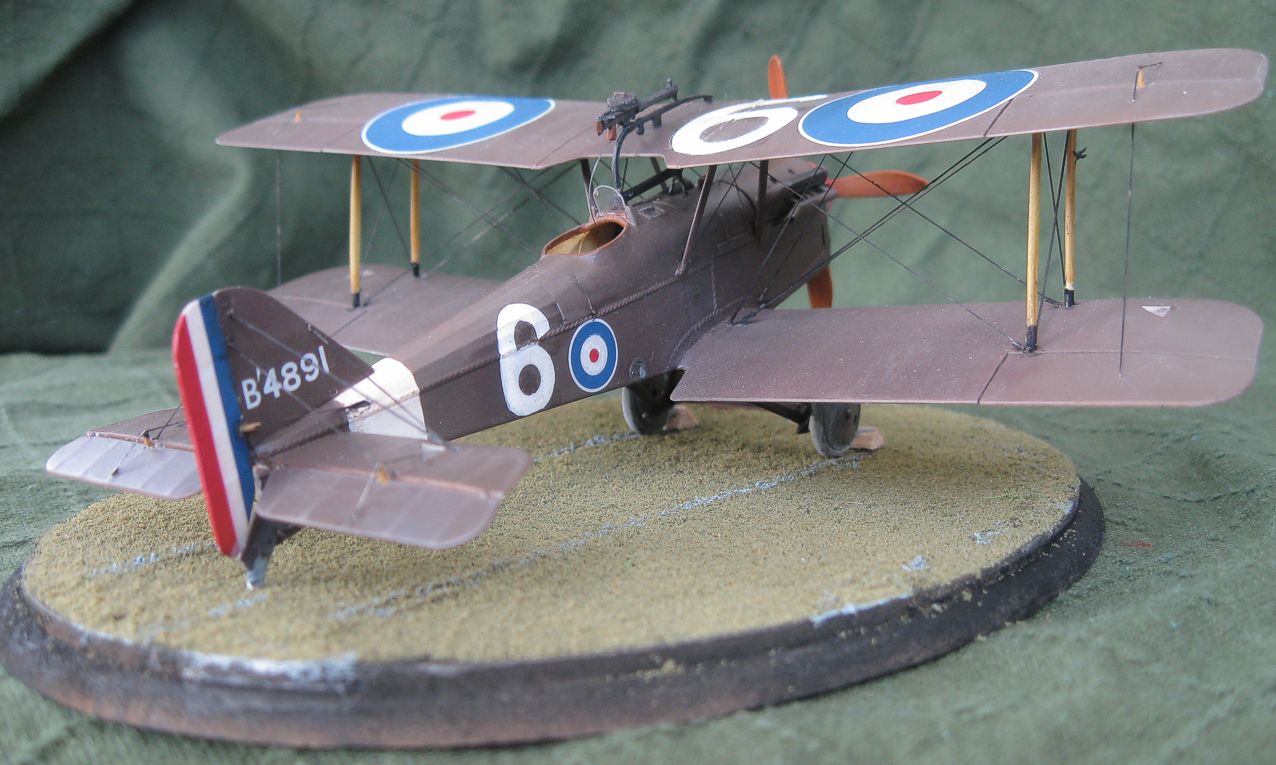
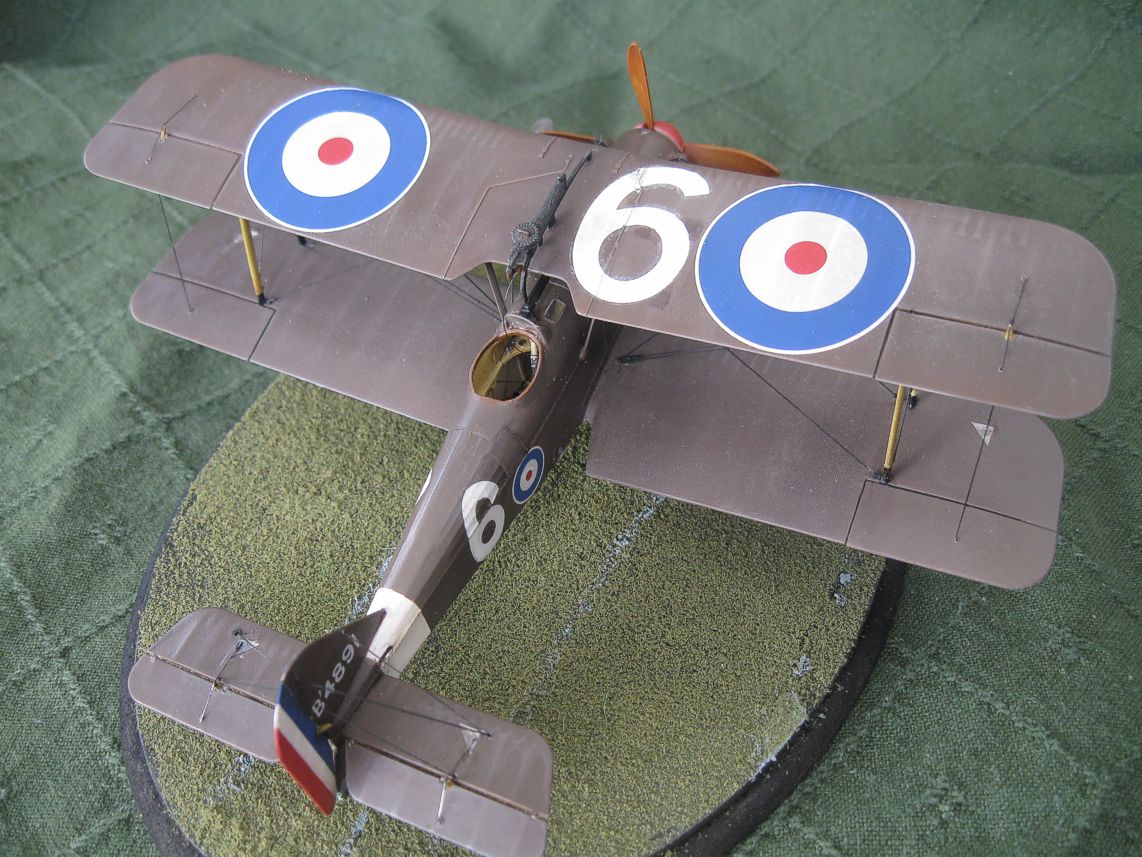
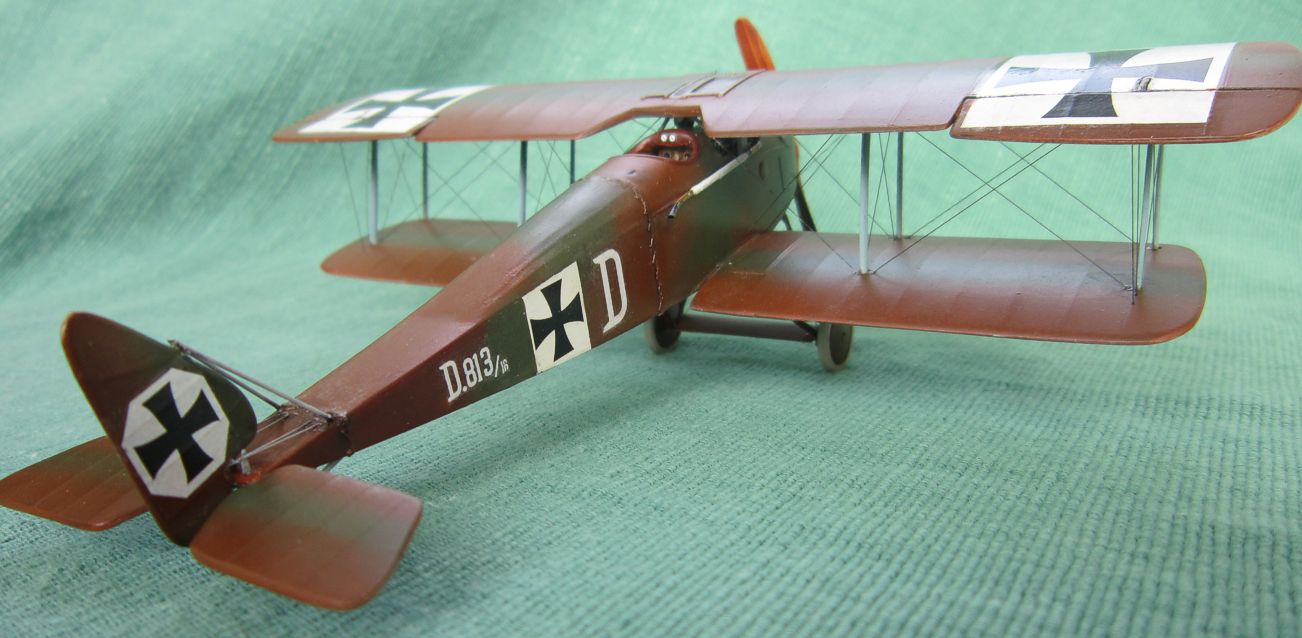
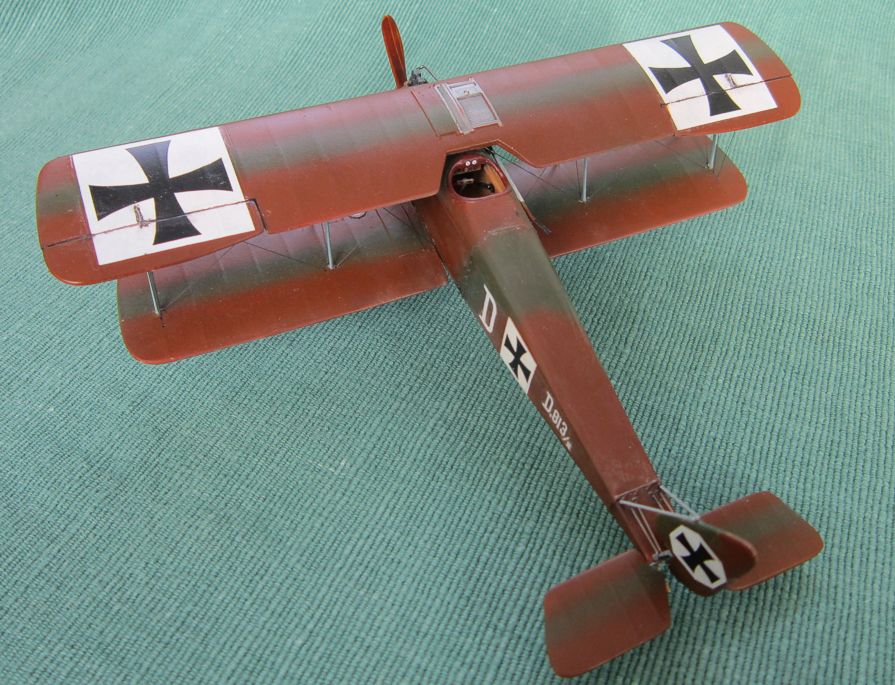
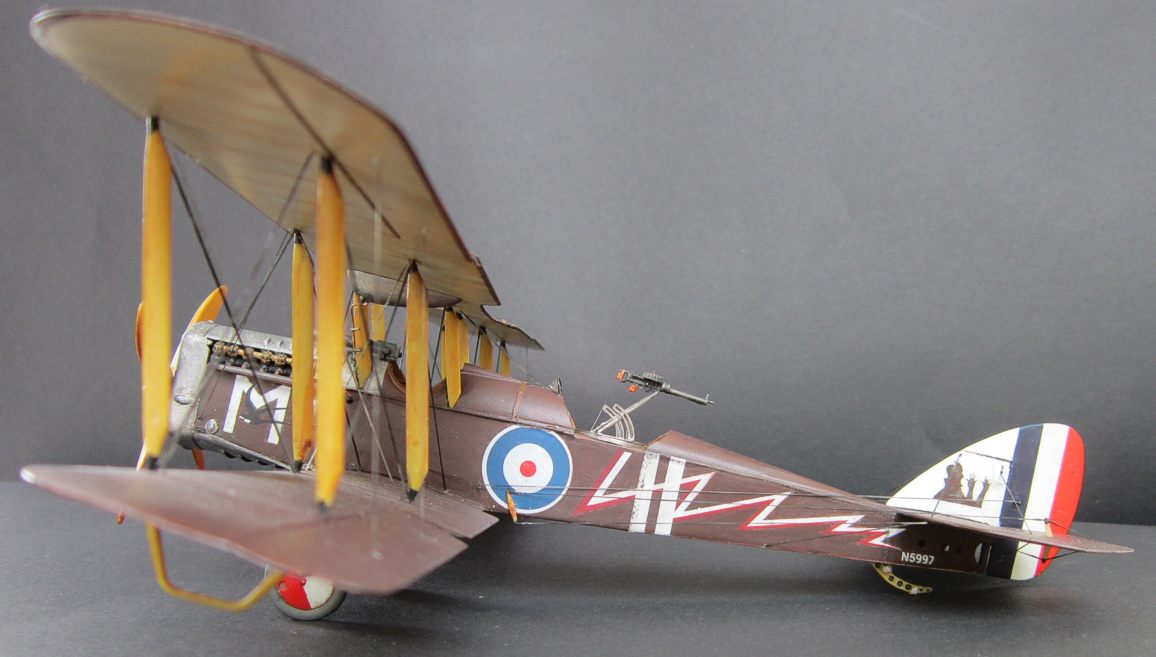
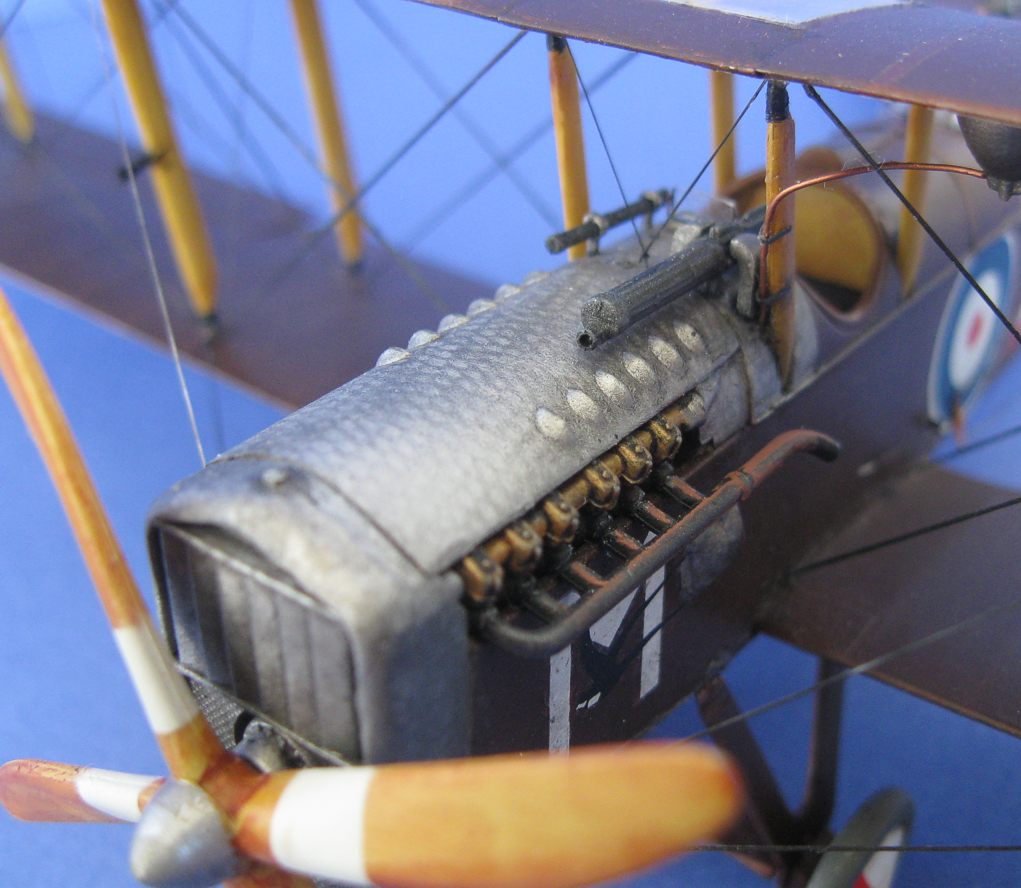
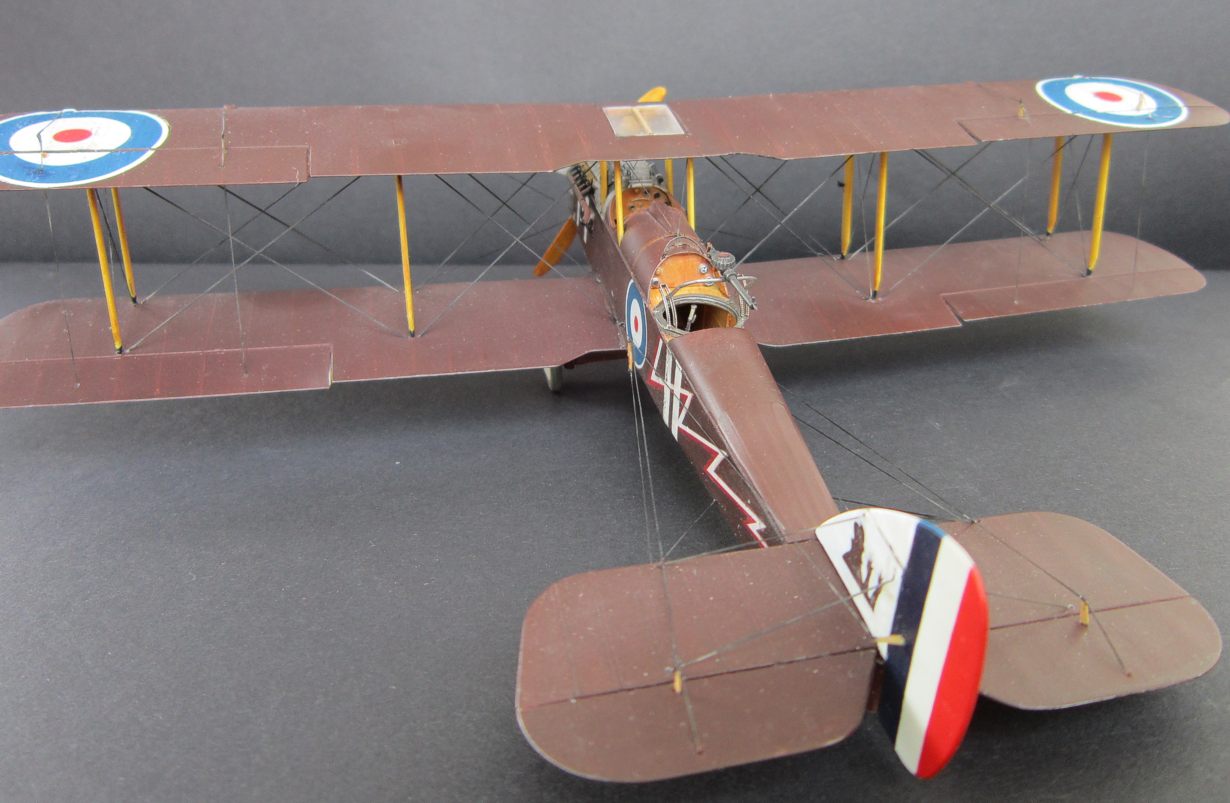
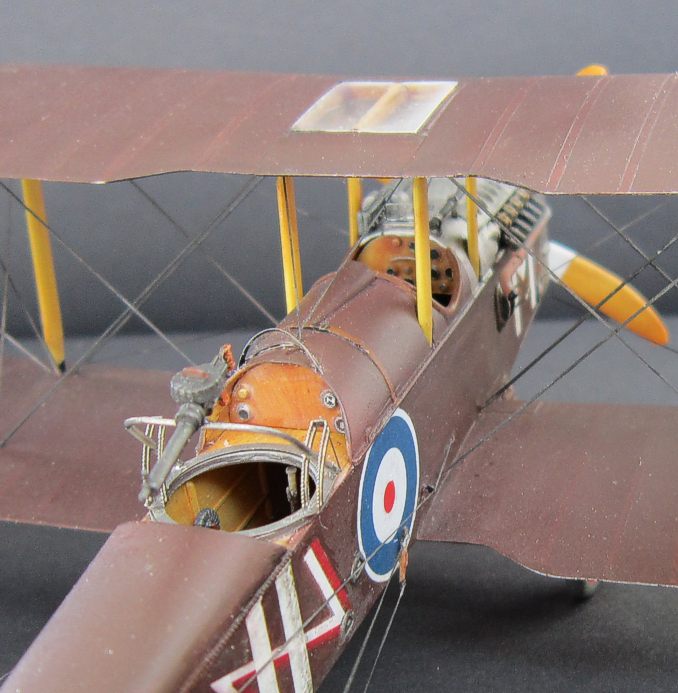
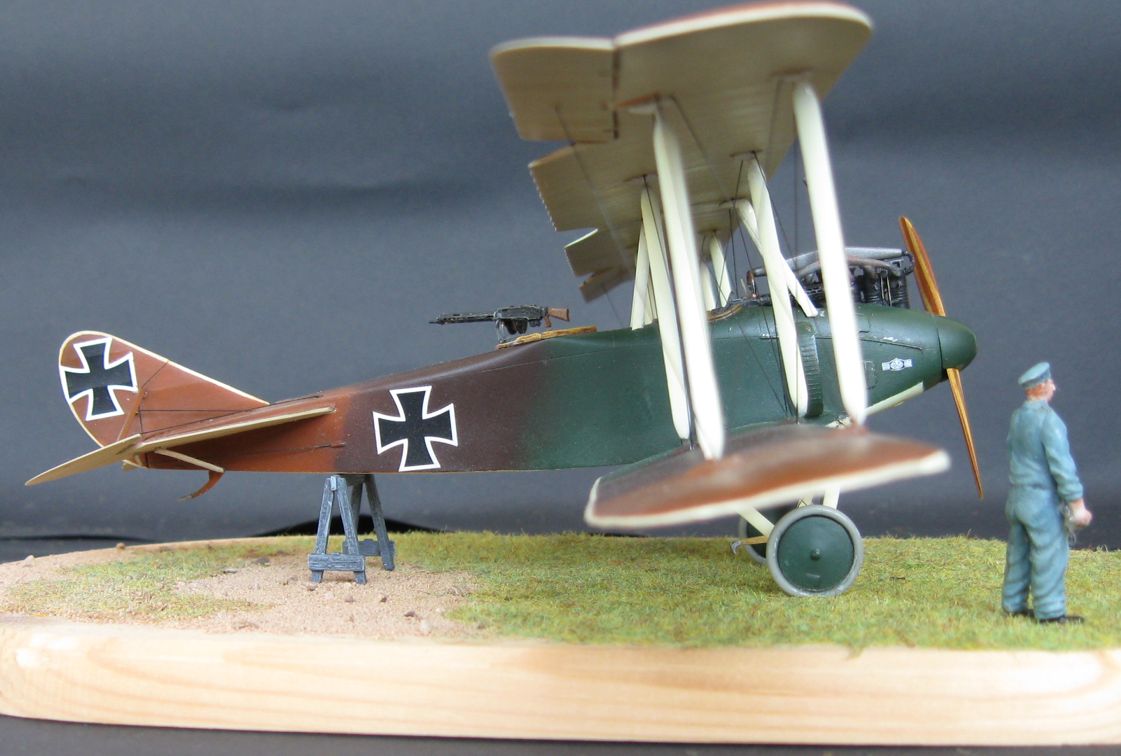
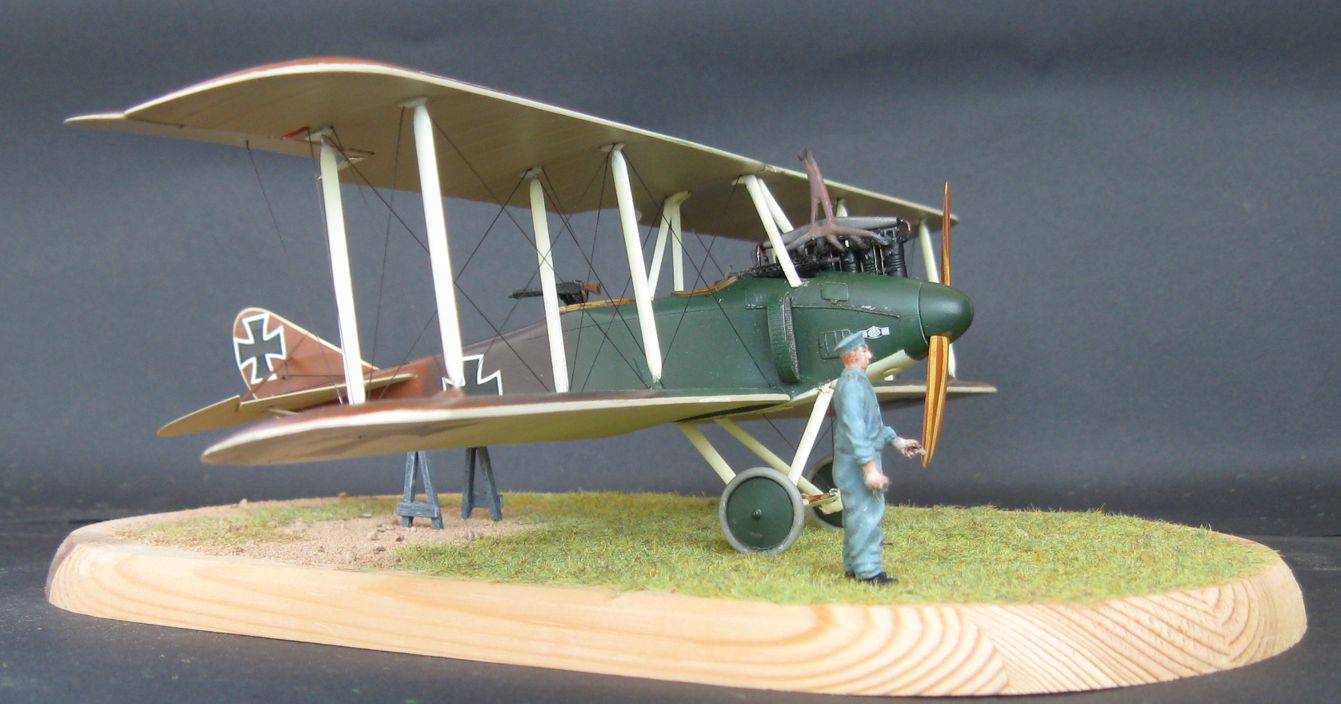
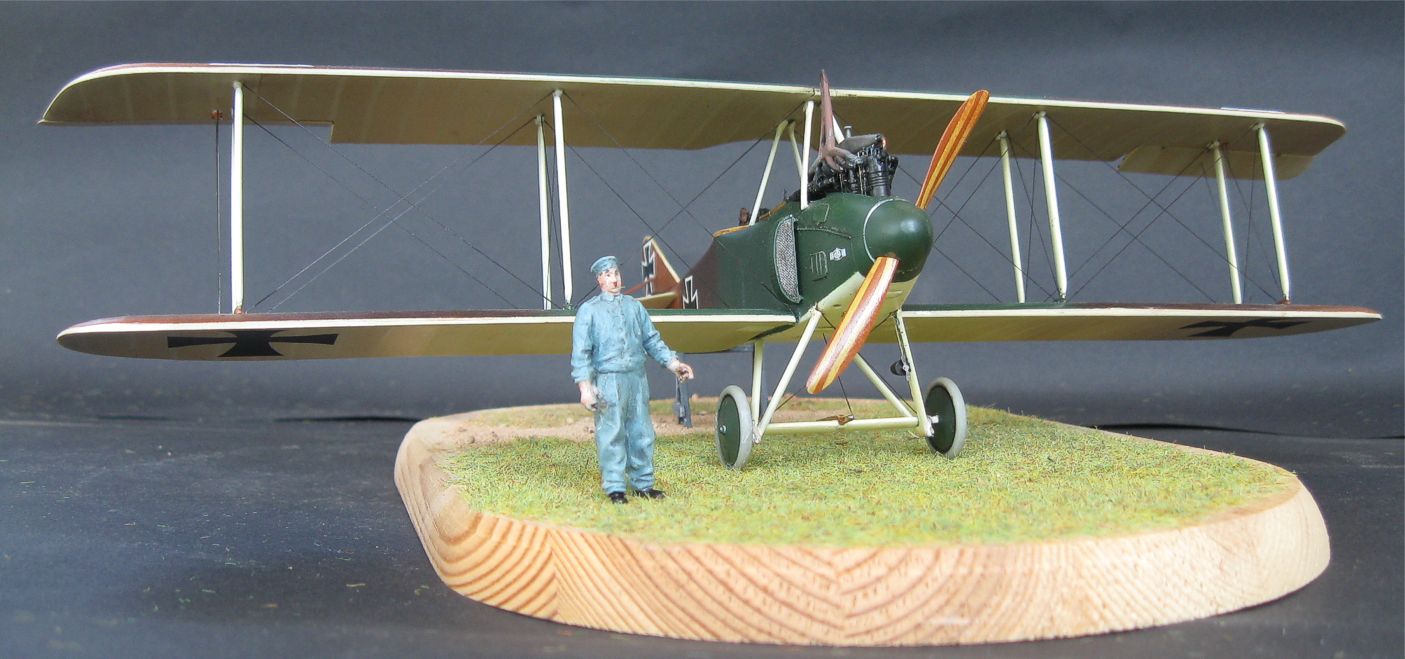
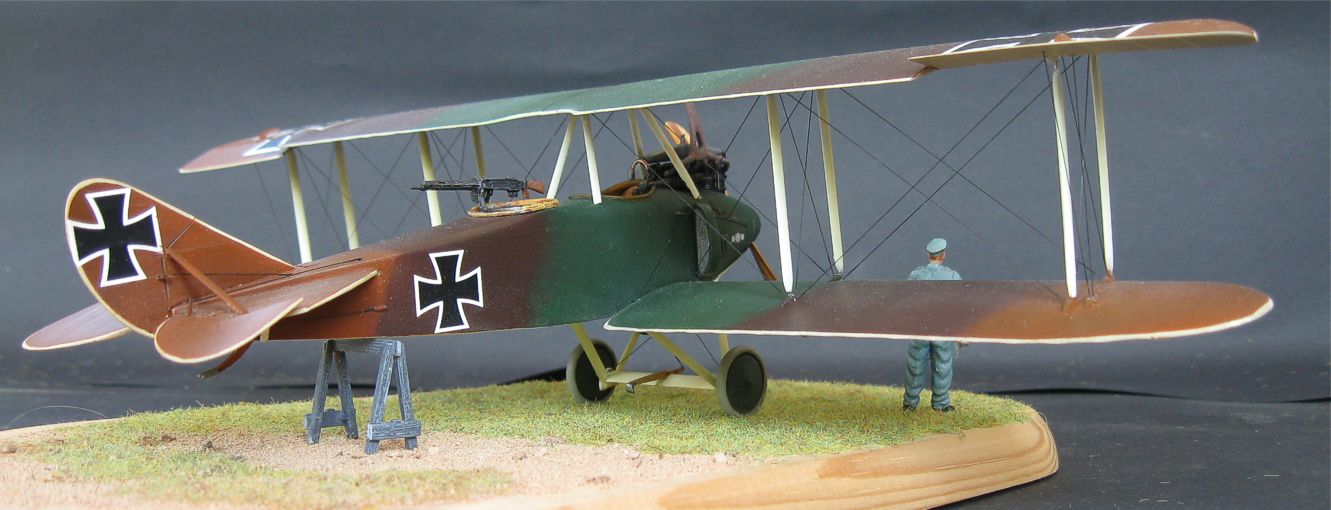
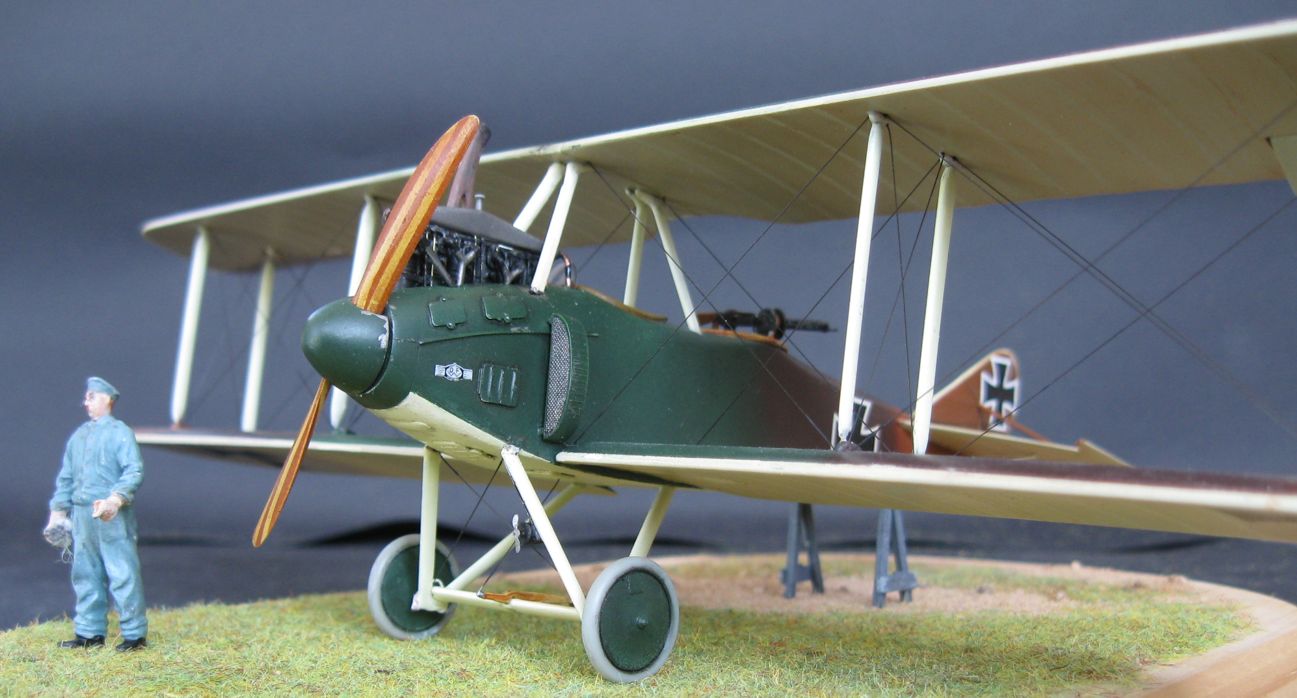
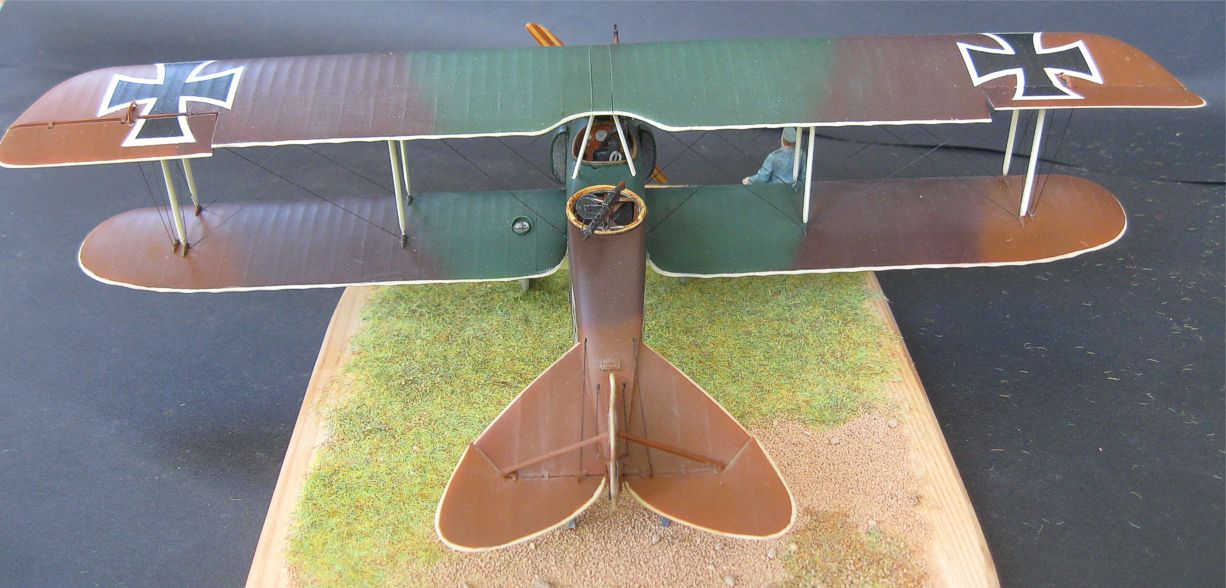
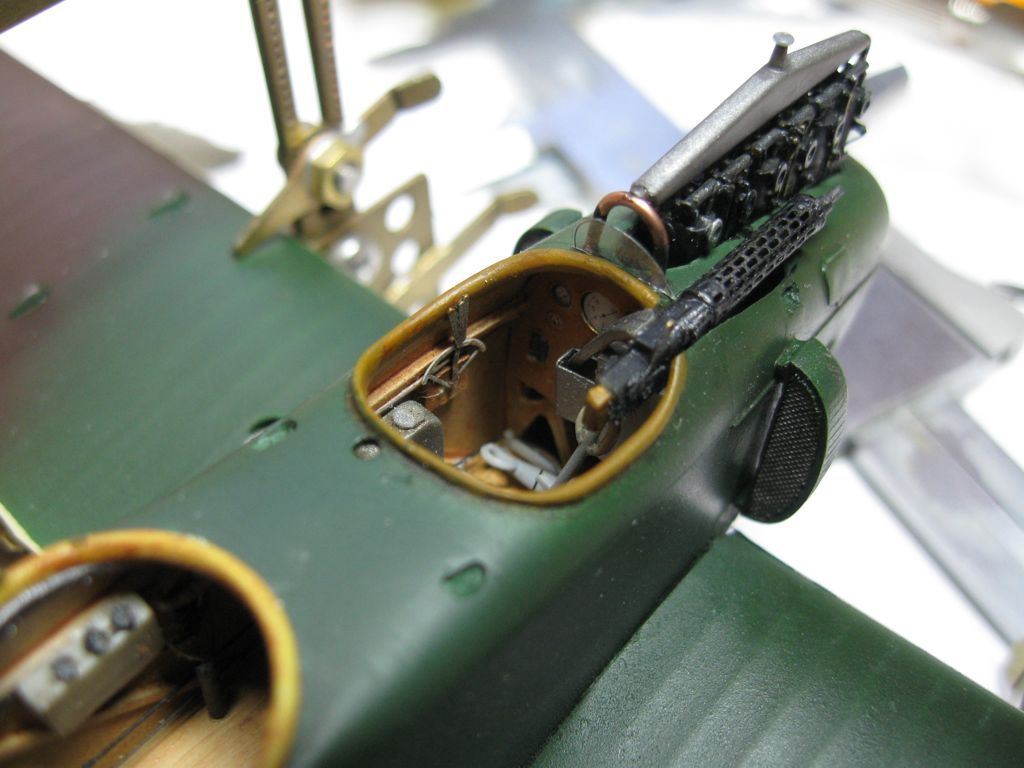
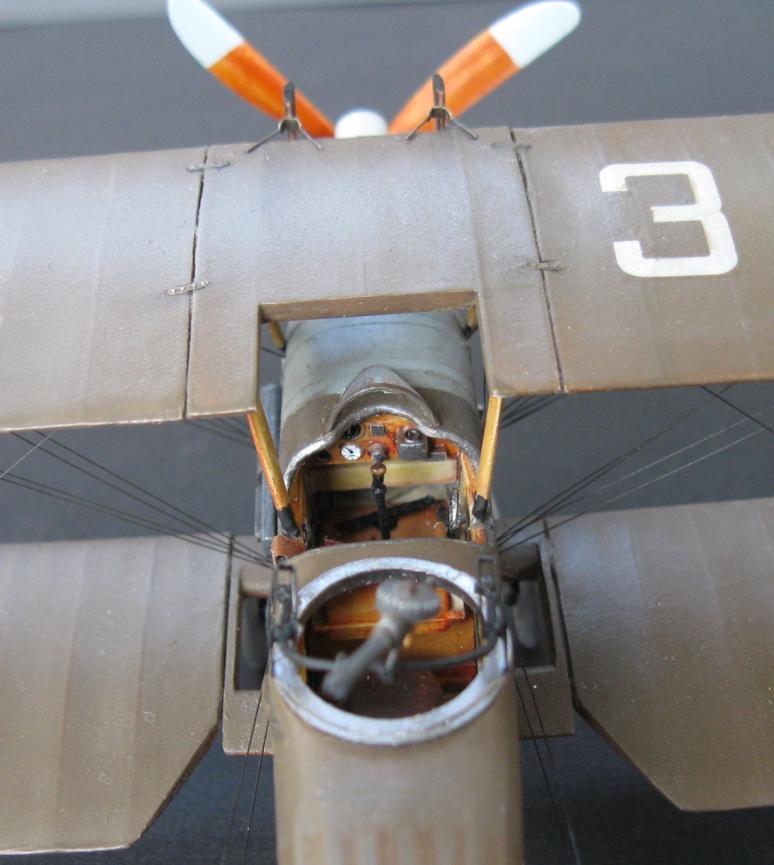
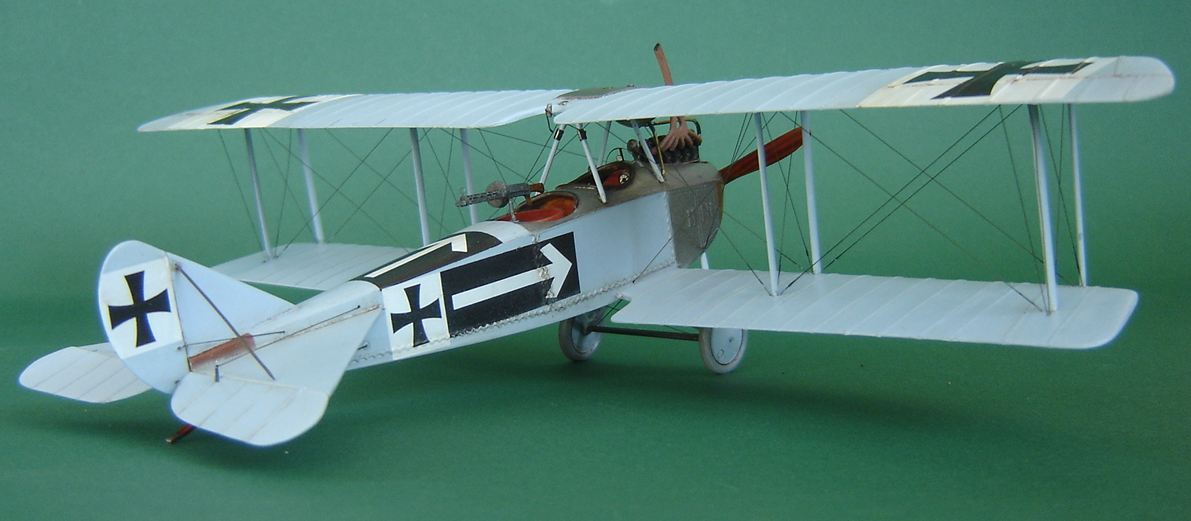
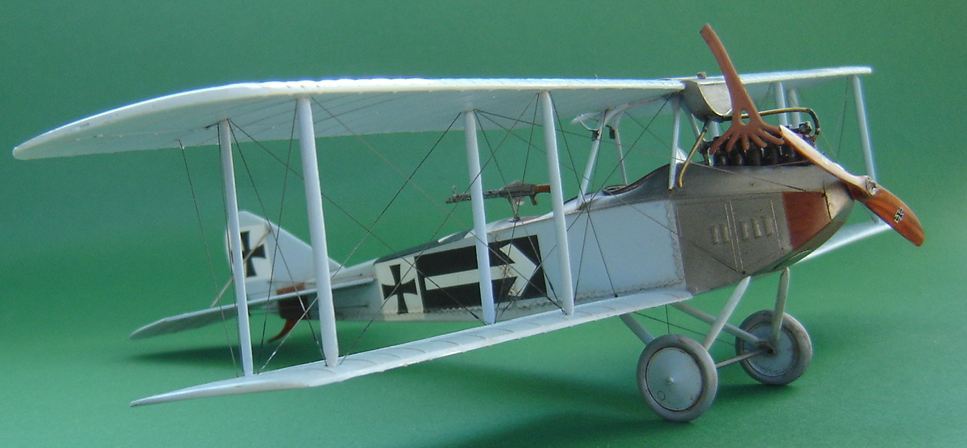
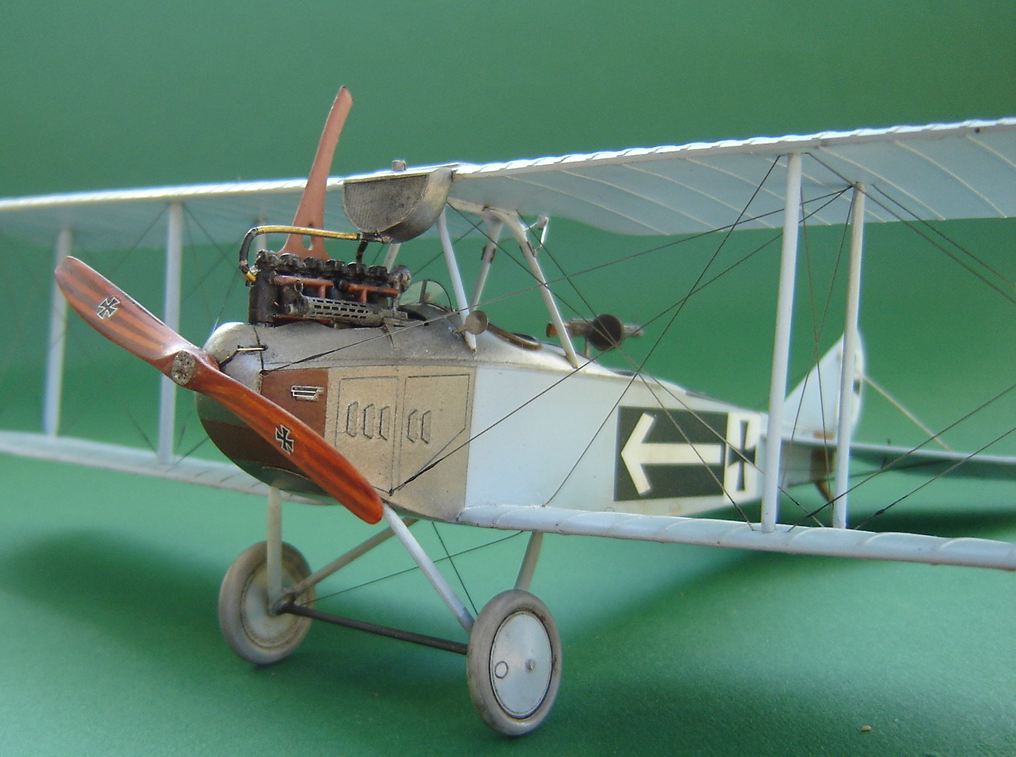
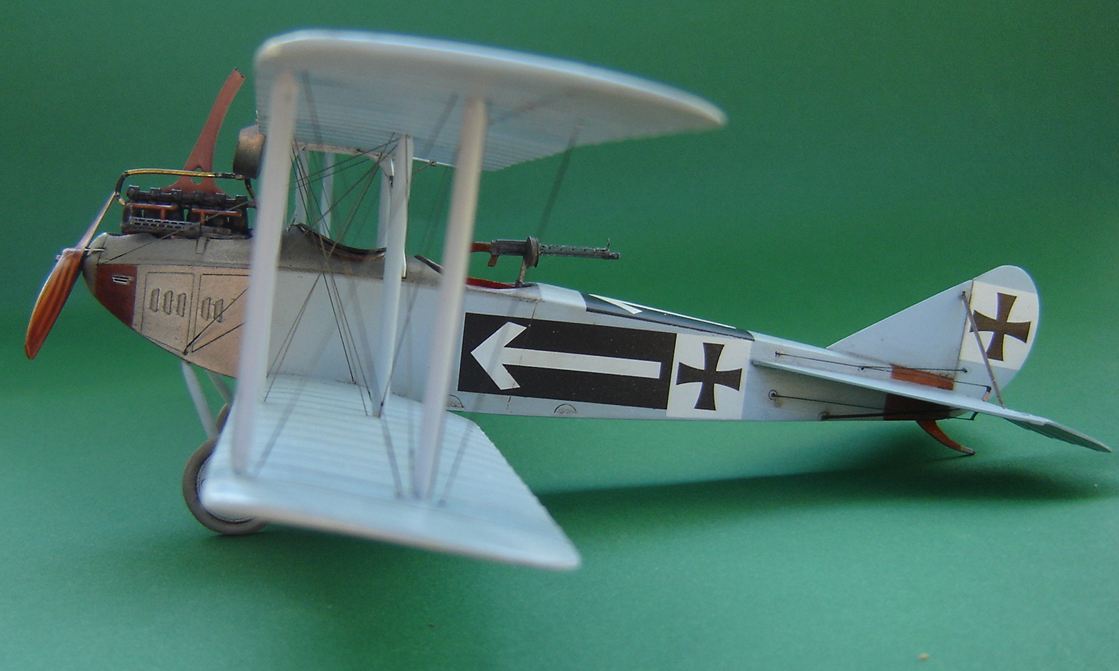
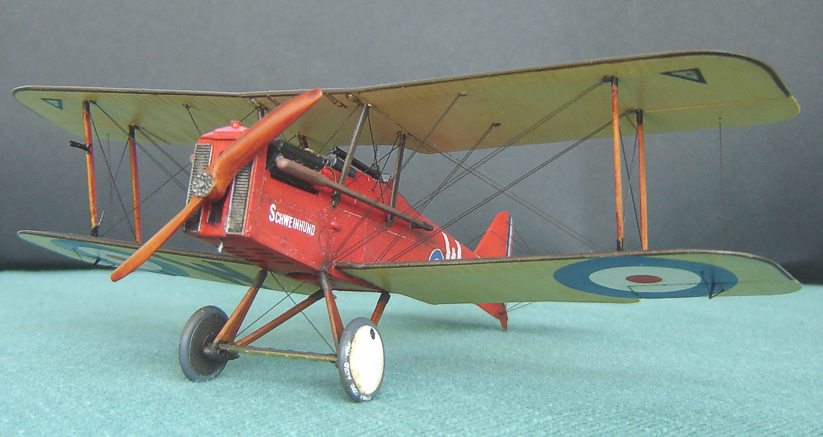
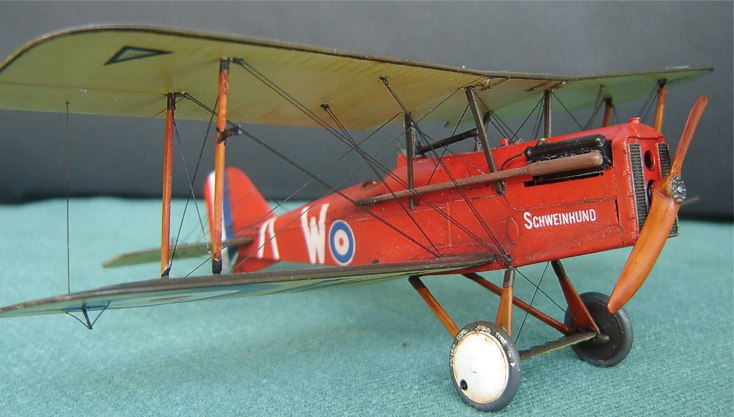
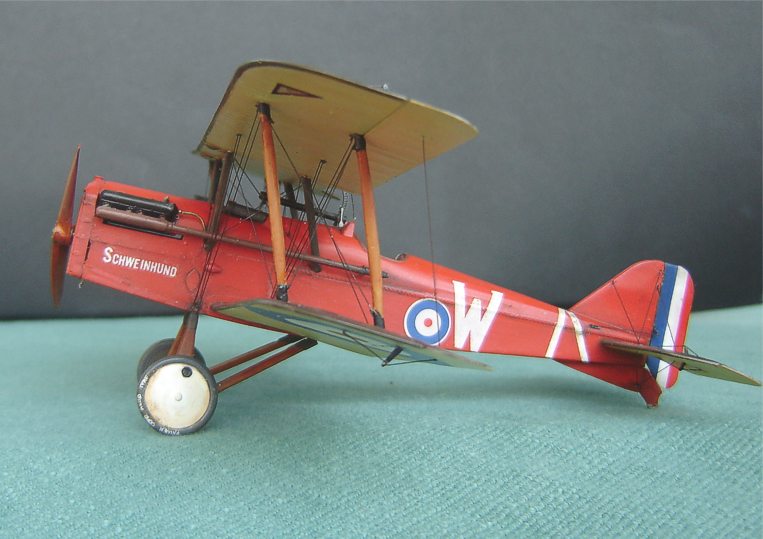
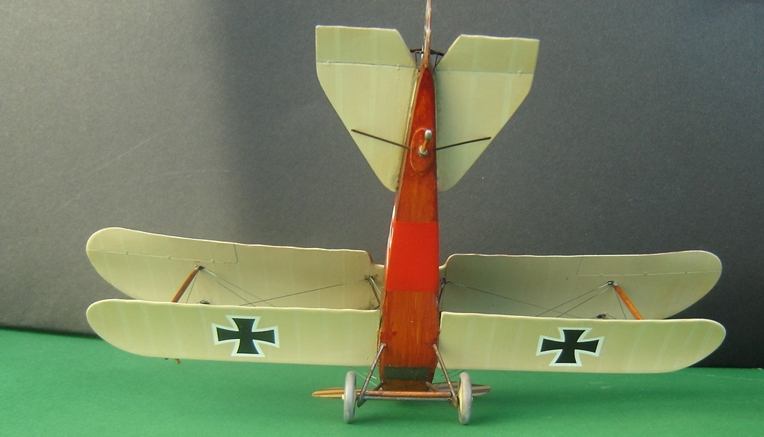
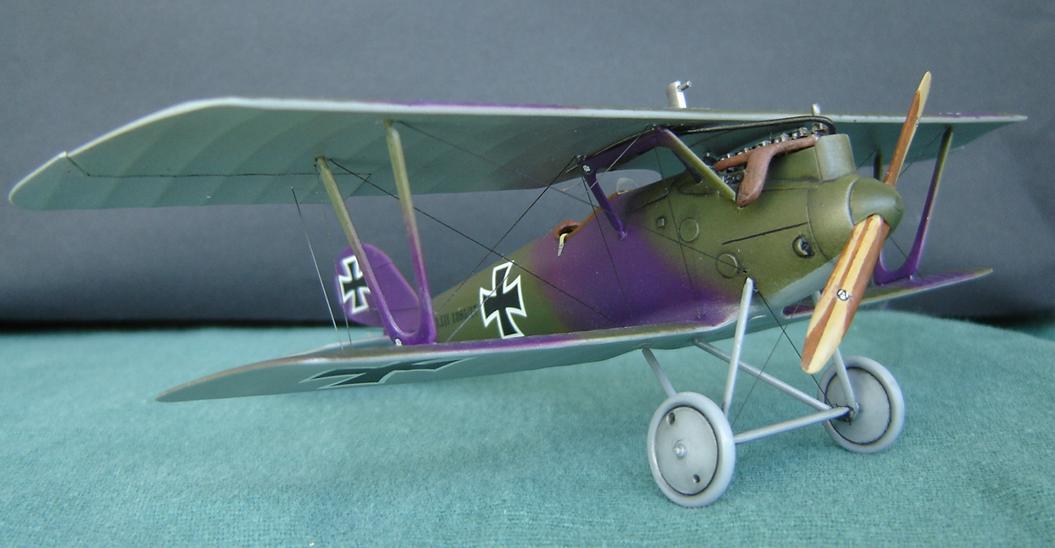
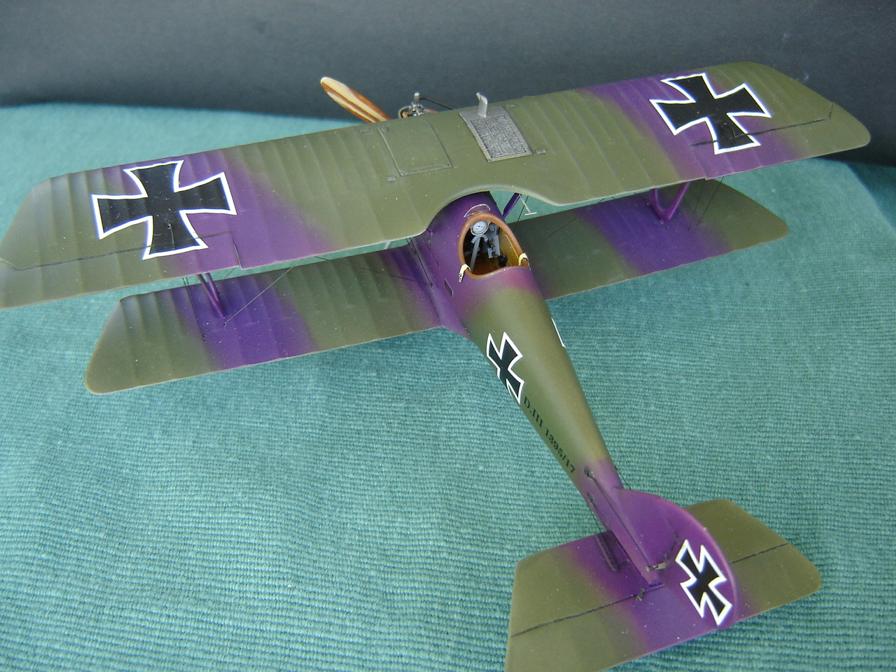
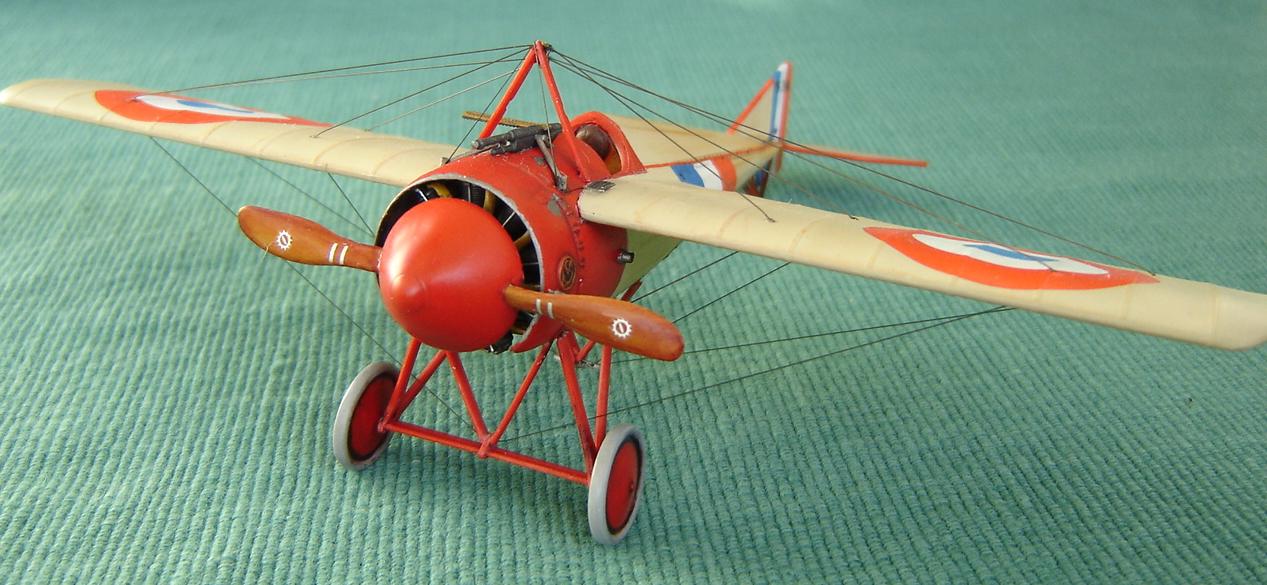
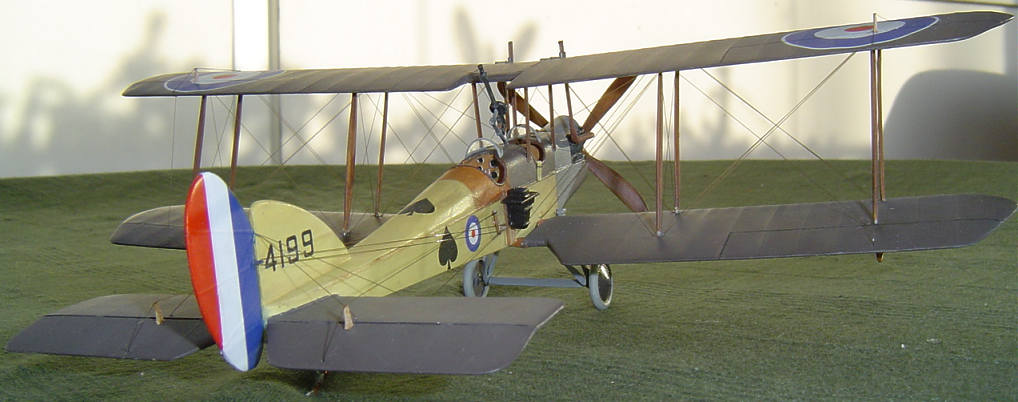
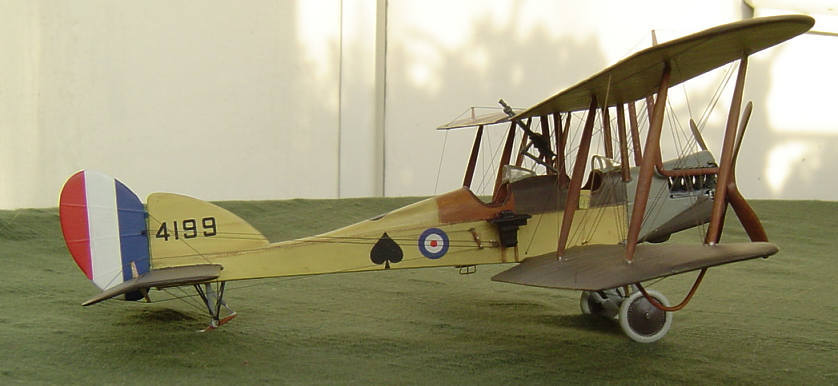
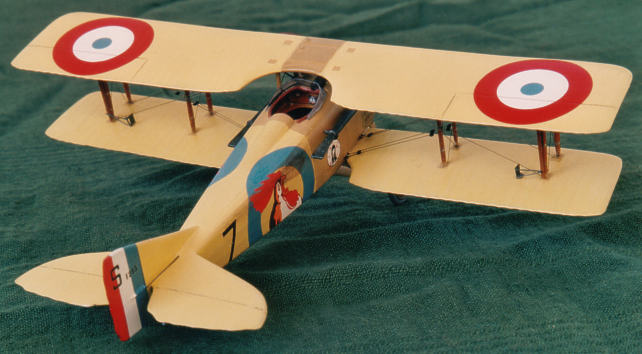
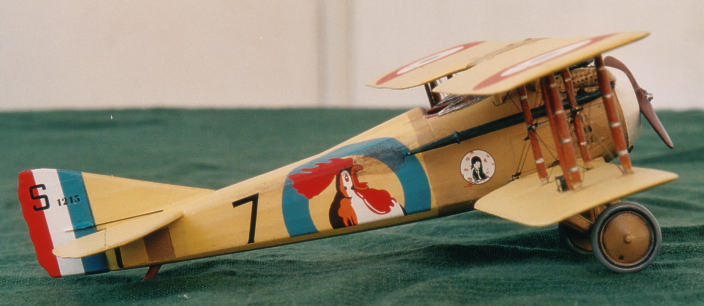
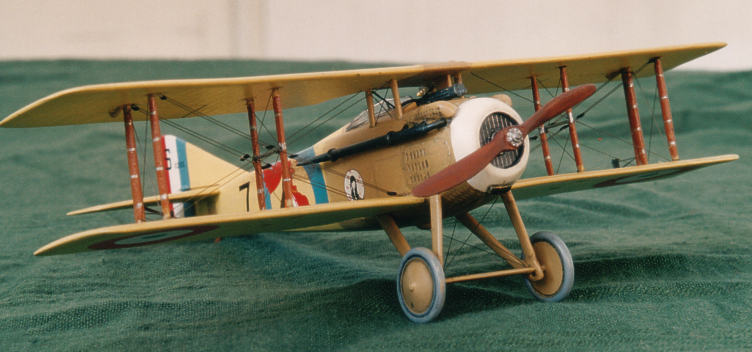
My second effort on this Roden kit. The Hispano Suiza version of the kit includes the spinner and short span elevators for McCudden's famous B'4891, but the cockpit with roundish plywood panels around the opening you have to scratch. I tried to avoid Roden's own decals, but I could not find any replacements for the upper and lower wing 6s, so I had to use the offerings from the kit sheet. The lower wing 6 went on ok, but the upper wing decal is silvering a bit.
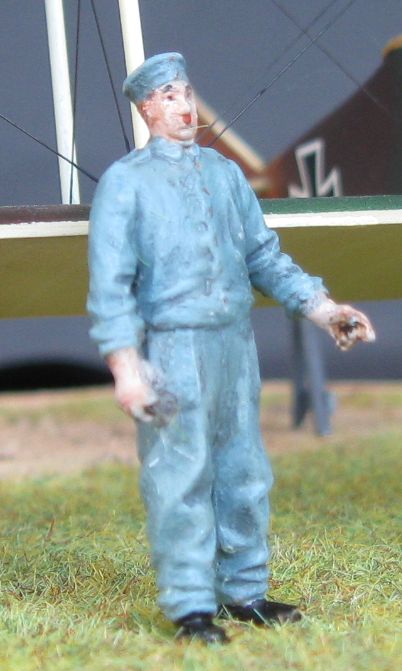
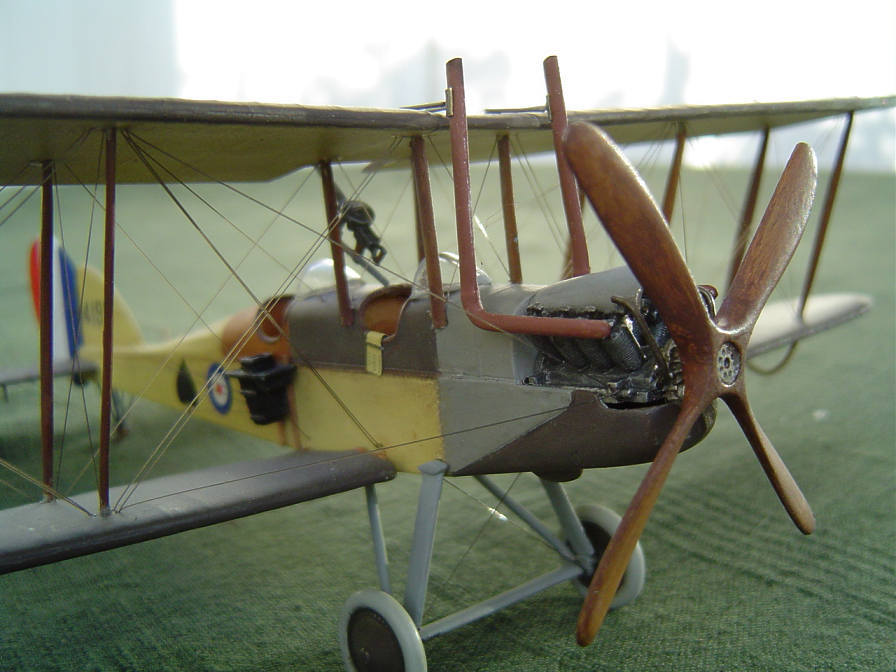
The dude is from Eduard's RFC Personnel set. He does not look much like McCudden, I'm afraid, and he's also way too tall to be the famous British ace.
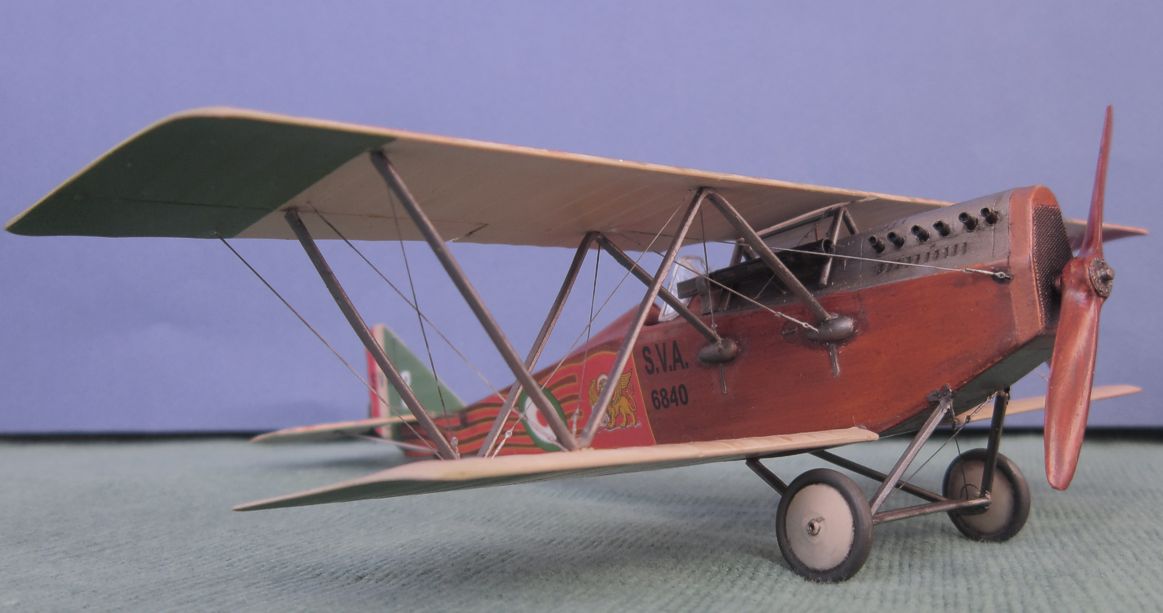
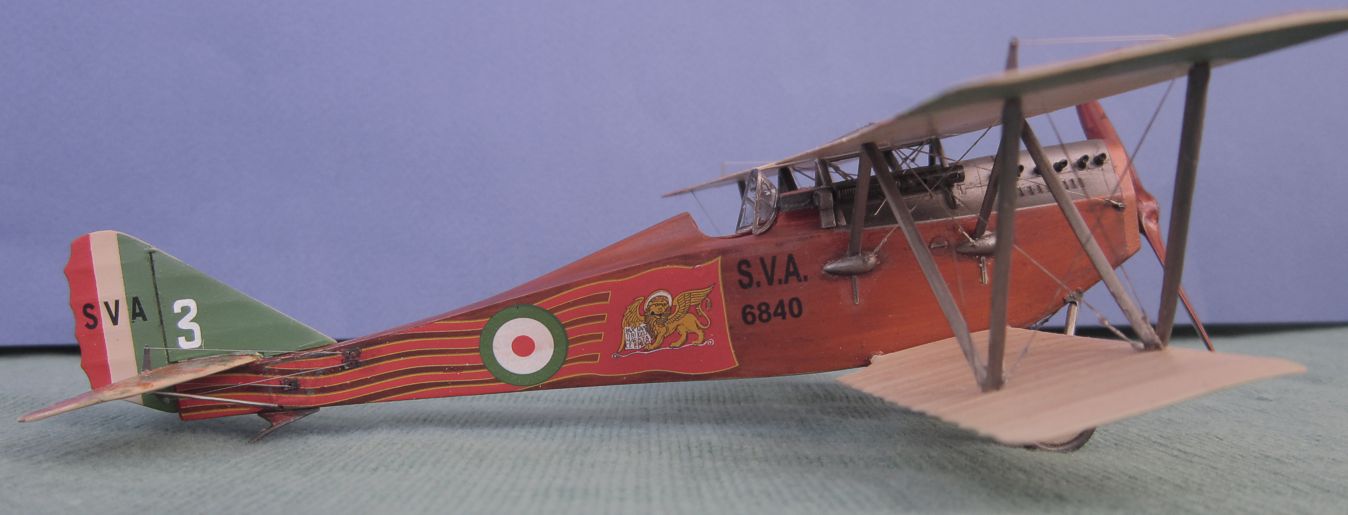
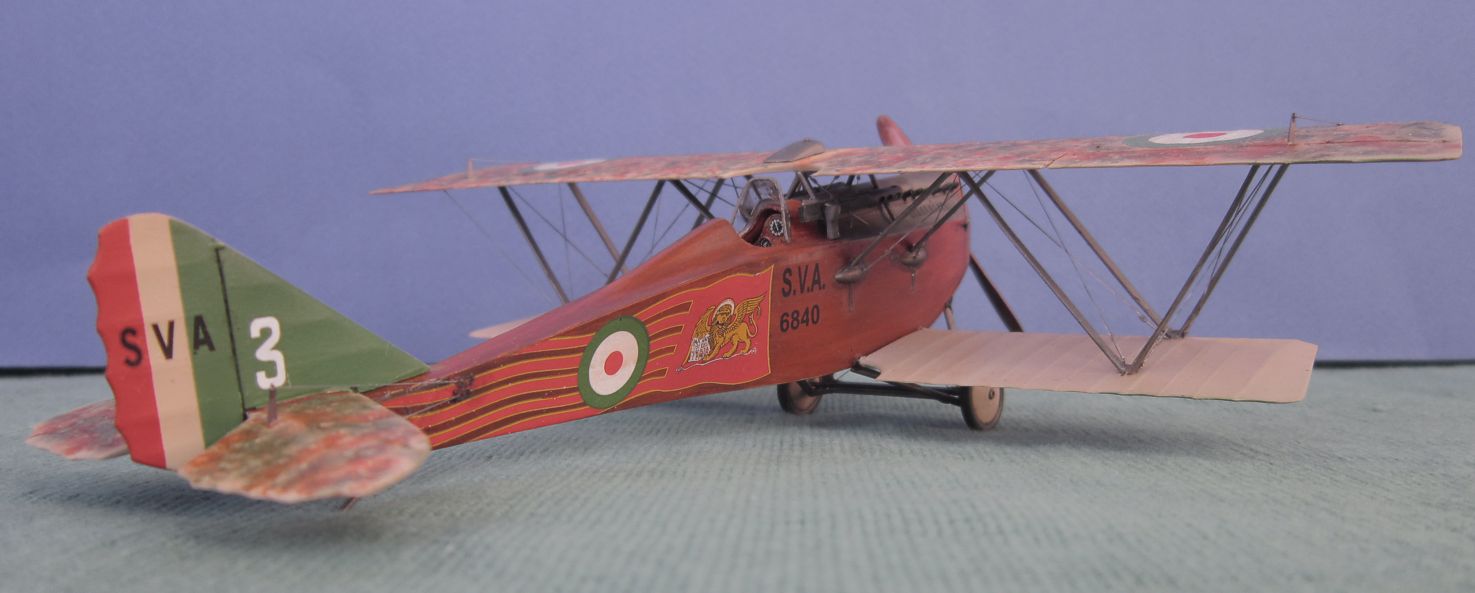
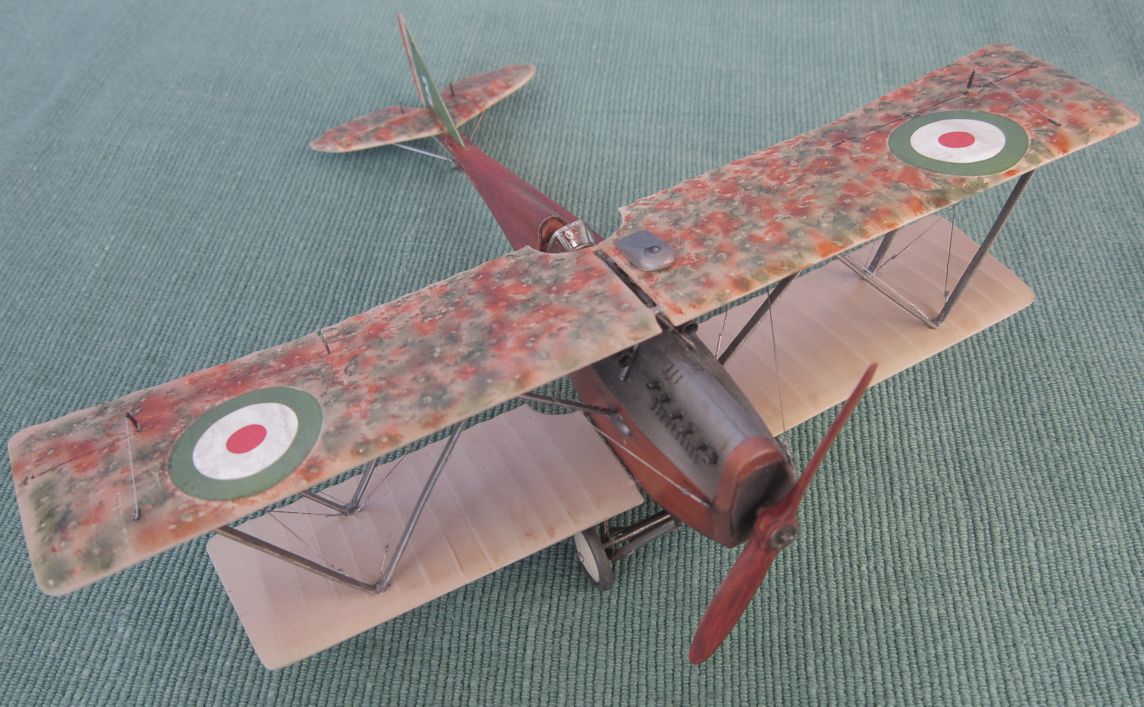
The best WW1 kit Fly has put out so far (I write this in May 2013). They have SVA5 also in 1/72. The buid is mostly OOB. I added some PE from my spare part box and replaced the lower wing attachments with steel wire. The turnbuckles are by Gaspatch Models (www.gaspatchmodels.com) and the rigging elastic line and surgigal wire.
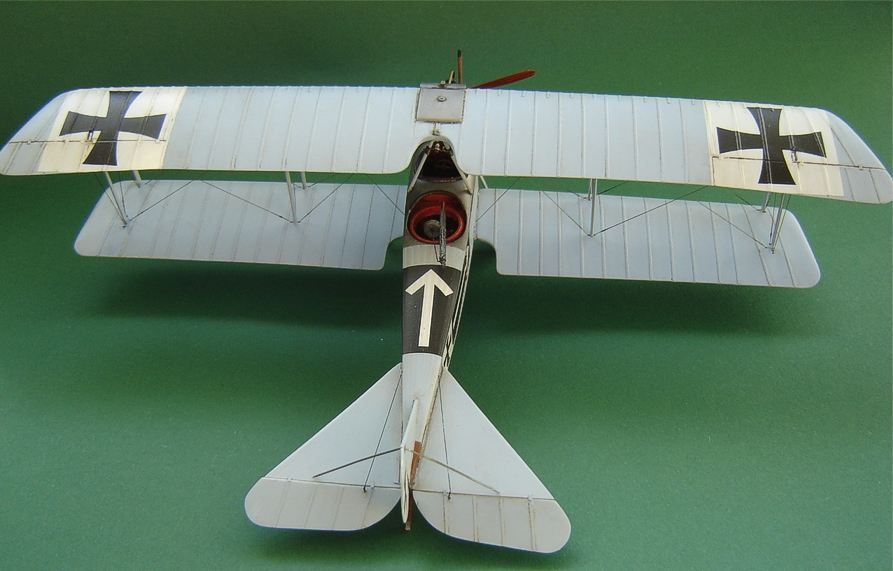
The first and probably the last Blue Max kit I'll ever build! It took me almost 7 years to finish this. I got frustrated with it several times. I could not get the fuselage halves and nose part to fit and you can see it! The trailing edges of the wings are just about as thick as the leading edges. Who ever baked the tail parts sure used a lot of leaven. Finally I decided that, tho it might not win any modelling contest, it might end up to look something like a Halberstadt fighter. And it did. Now that there is numerous exellent, good or at least reasonably good kits of ww1 planes available, the Blue Max kits can be recommented only for masochists!
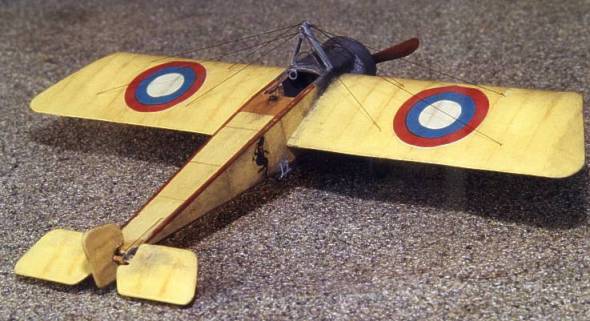
It was a bit tricky to put the fuselage together, but otherwise a pleasent build. The Roden decals, however, were my Waterloo once again... From now on I'll make sure, that I have some aftermarket sheets or home made decals, before I even start to build another Roden kit. The PC 12 (this was a RNAS plane) is Citadel Scorched Brown. The aluminum parts are painted with Citadel Boltgun metal. Citadel Chainmail is tapped on with a semi dry brush trough a piece of gauze. The riggin between the wings is done with flat elastic thread, which is, after streching, about 0.2 mm wide and 0.1 mm thick

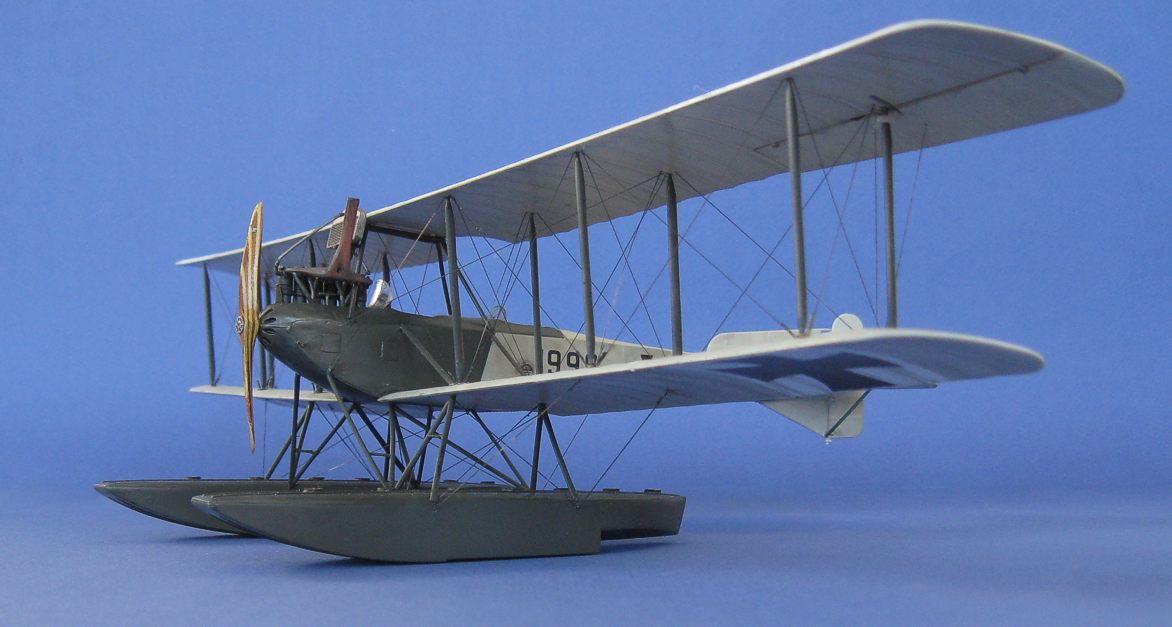
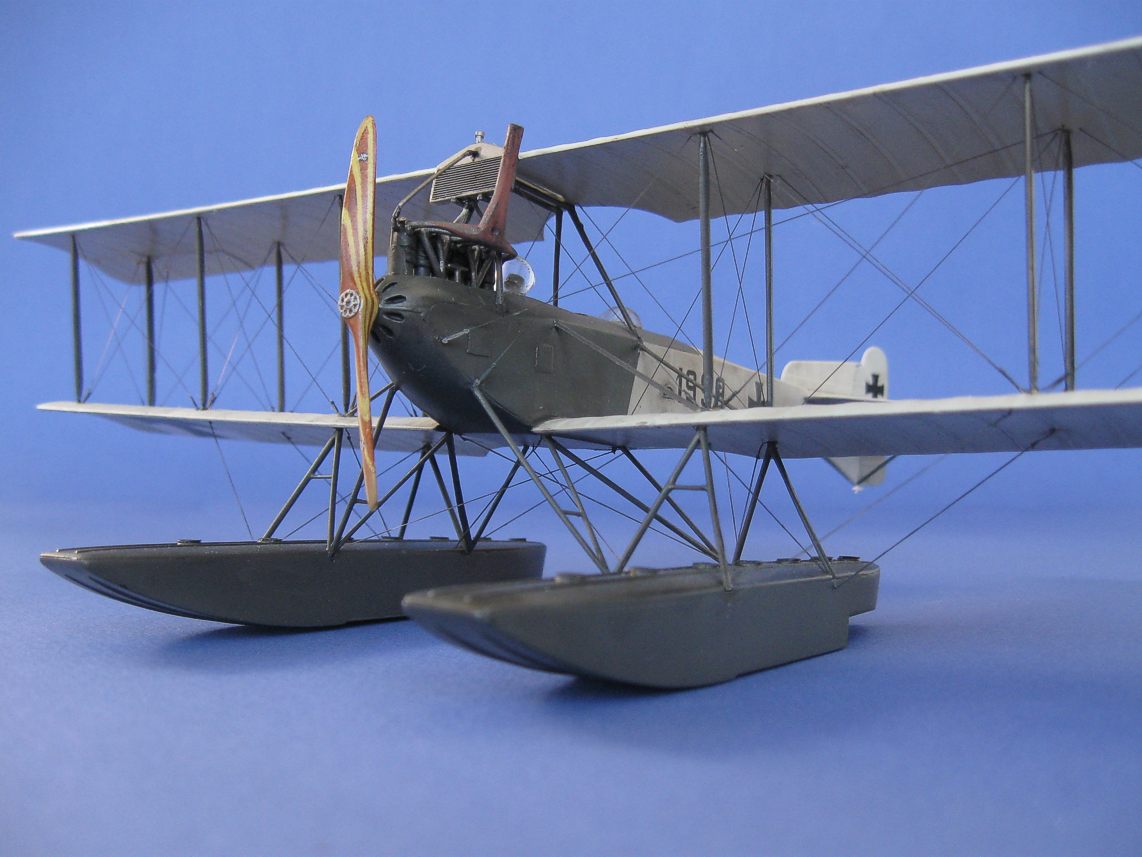
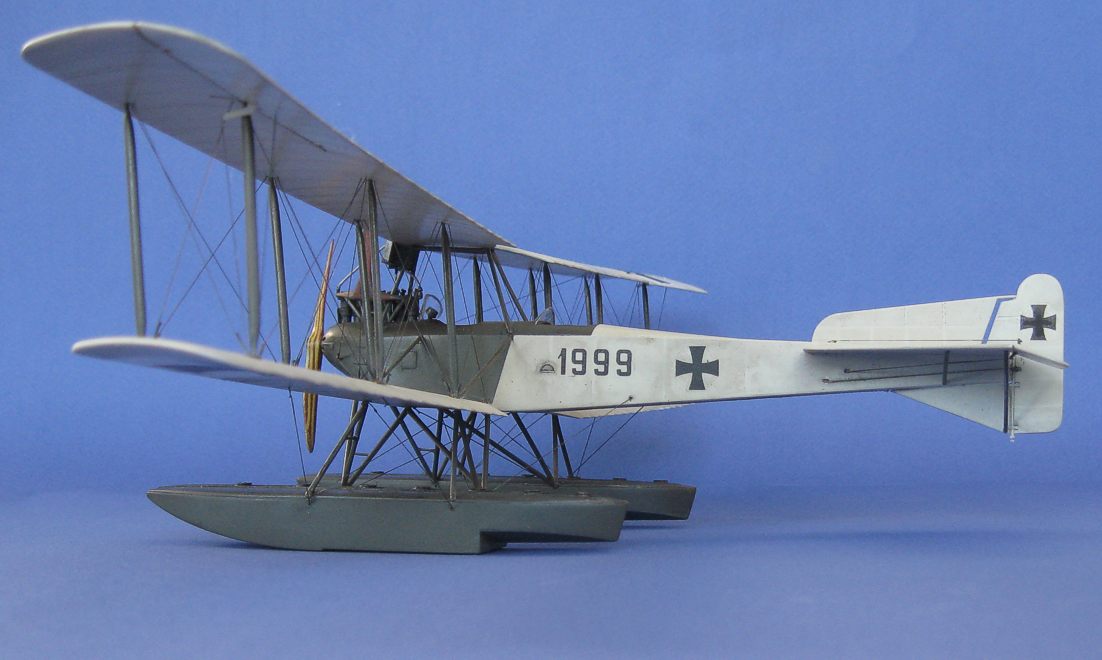

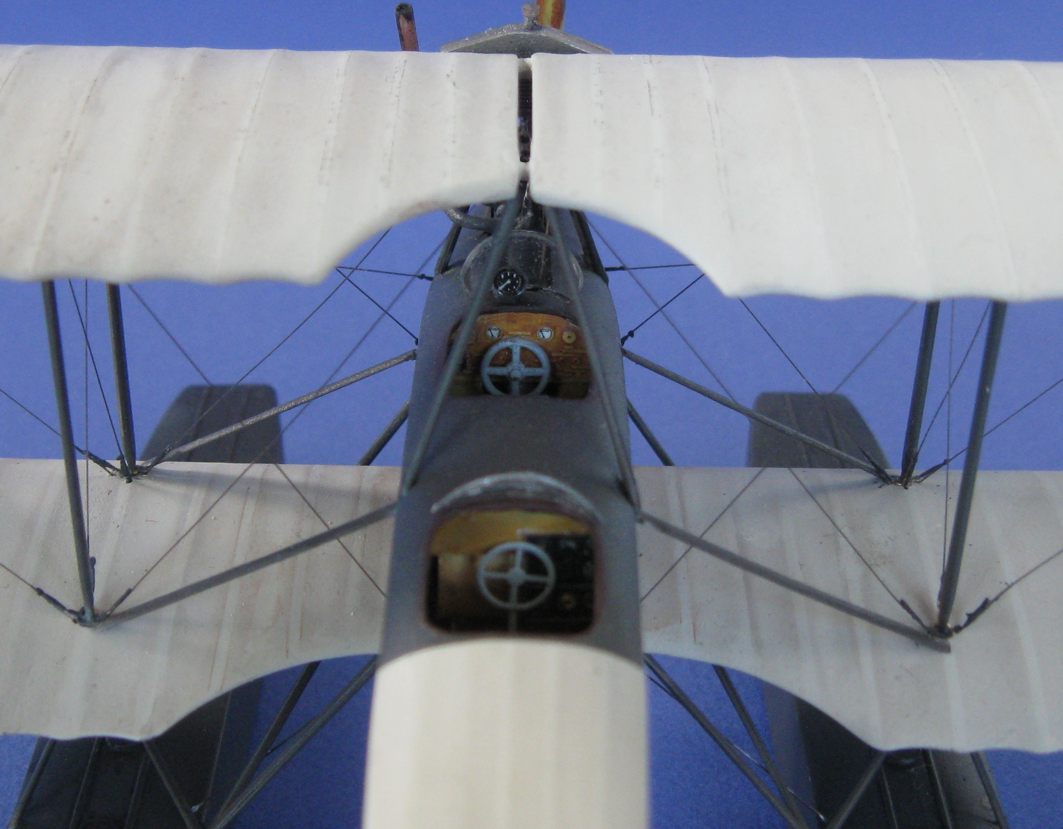
Nice and quite accurate kit I think! I used also the Part PE set, which was a bit dissappointing. This is a model of Friedrichshafen FF.33E 1999S, which was brought to Finland in the spring 1918. More about the build in Pienoismalli magazine 6/2011 (www.pienoismalli.com).
Karaya's resin DFW C.V is an elegant kit and builds up nicely. Only the cabane struts caused some trouble. The tank over the engine is also a bit too long. Cocpit is well detailed, but there is - of course - always something to add. I scrached the ammo and empty belt boxes and the empty belt chute for the forward firing mg and the Telefunken transmitter and antenna to the observers 'office'.
The colour scheme is from Dans San Abbott's article The Colours of DFW Built DFW C.V - Part 2
. The colours are Vallejo Sick Green with a drop of black in it, Citadel Scorched Brown, Bestial Brown and Bleached Bone for the CDL parts. The bottom of the fuselage is Vallejo white with a drop of yellow.
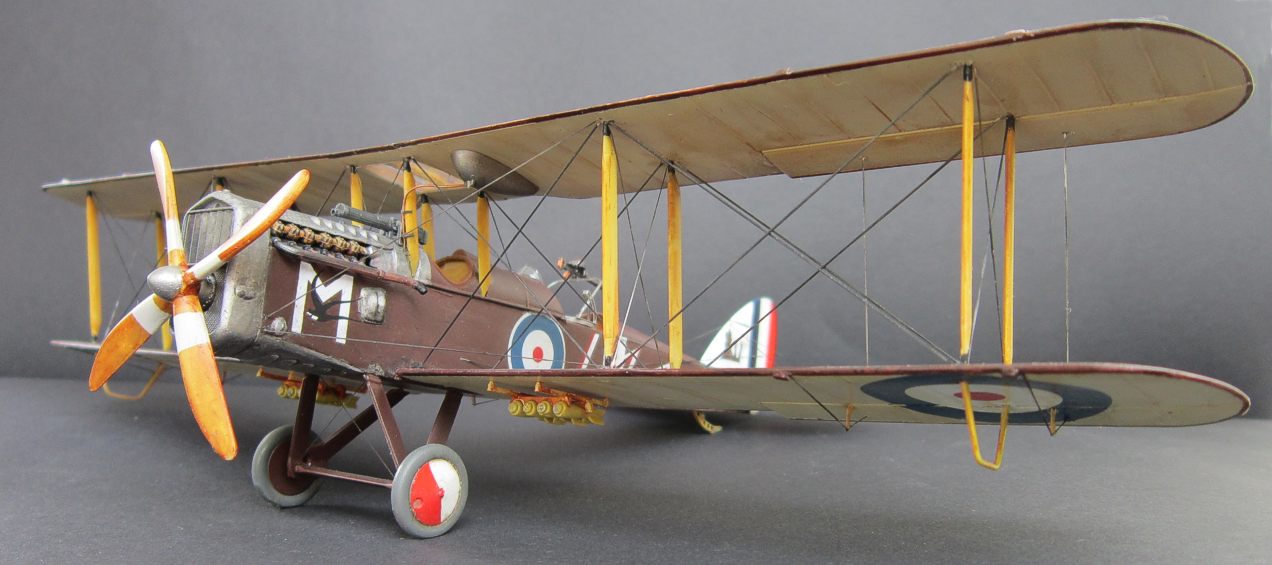
Aeroclub's old 'Harry Tate' has got a new life with some pretty good new resin parts for the engine, bottom of the nose and cockpit. The old molds for the plastic parts shouldn't be used any more, perhaps, since detail has gone soft or worn out completely. But can you blame Aeroclub for fulfiling a wish of many of us modelers of ww1 subjects in 1/48 and putting the kit available once more?! I added a lot of detail. I used Eduard seat belts and control horns, Part PE for Roden Brisfit and other surplus parts. Some of the rigging got loose on a trip back from a model competition. I had to use a moment of proper day light for photographing - those really are few in Finland in December! - and did not have time to fix the rigging. I used Citadel Bleached Bone for the cdl, Citadel Astronomical Grey for the nose and a 2 parts of Xacrylic Olive Drab and 1 part of Schokoladen Brun mix for the PC10.
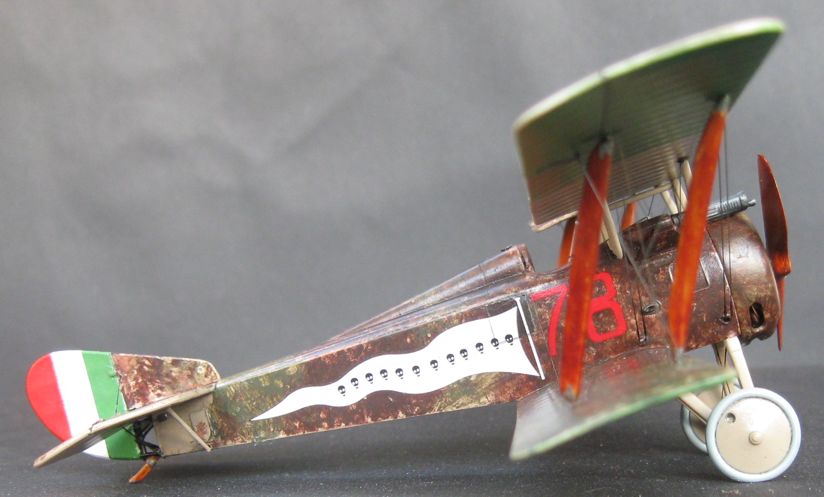
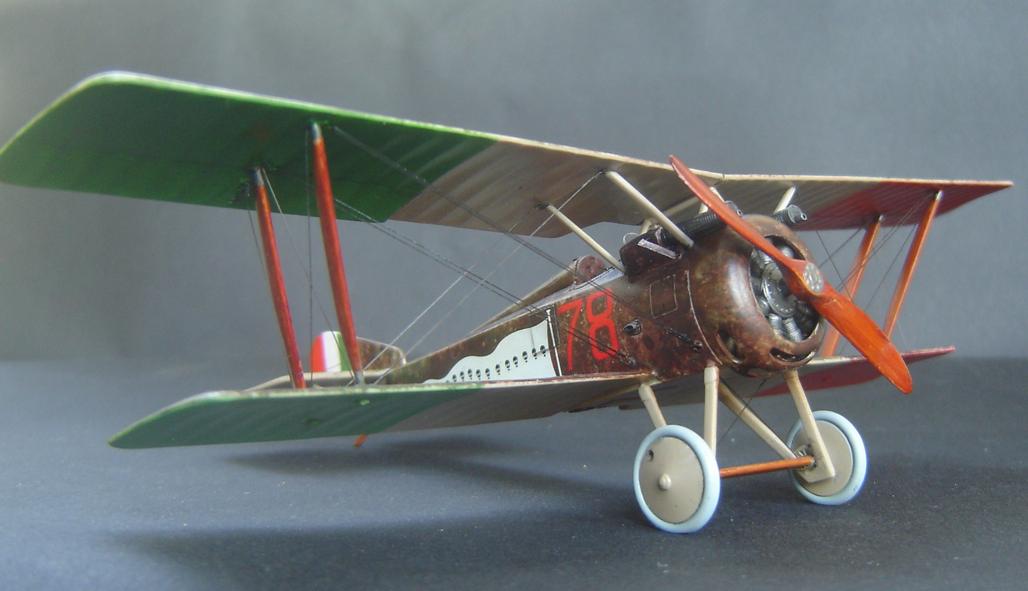
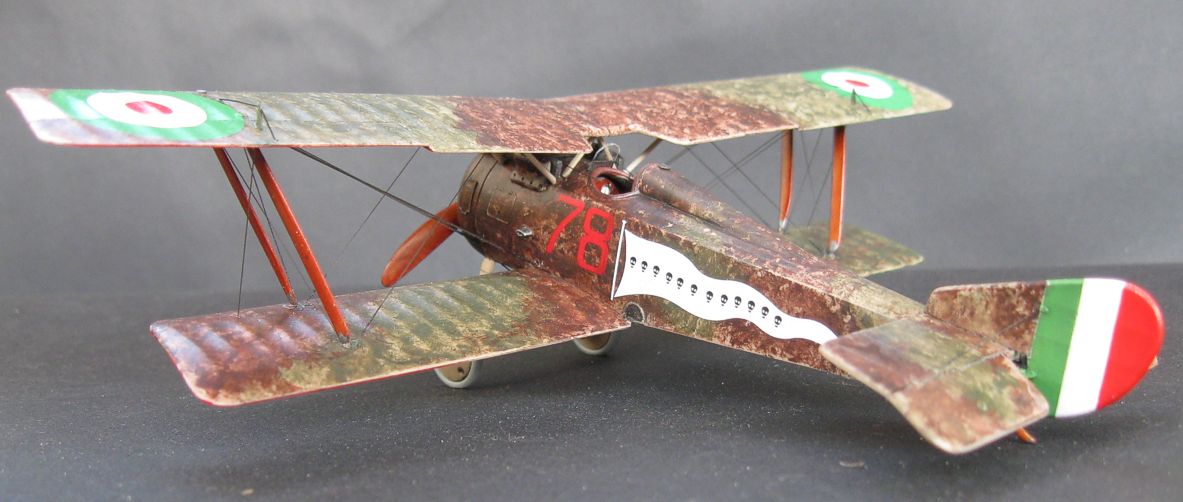
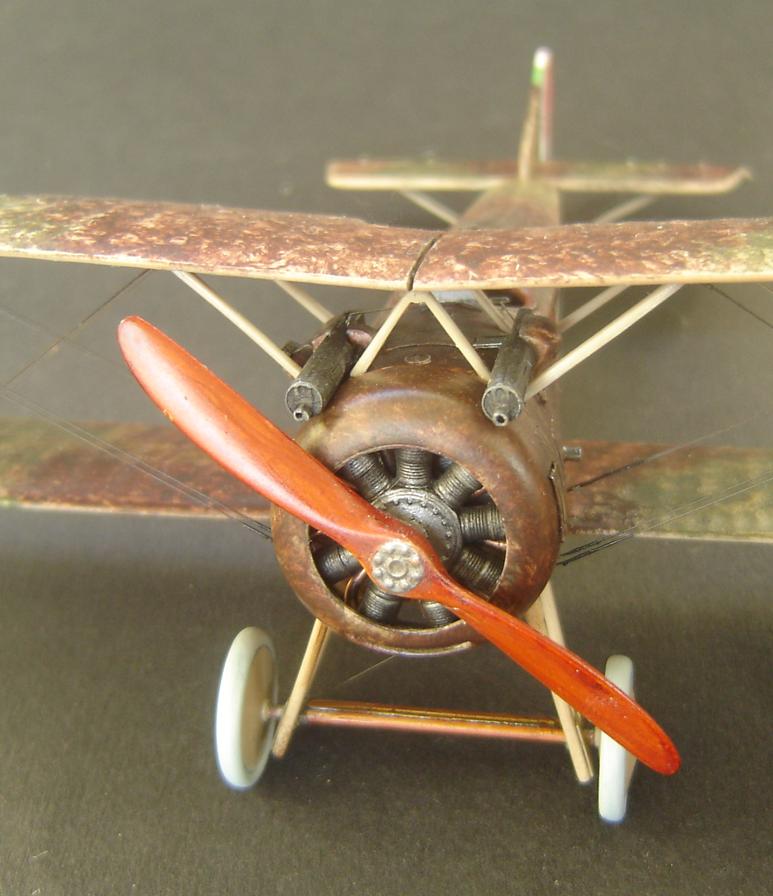
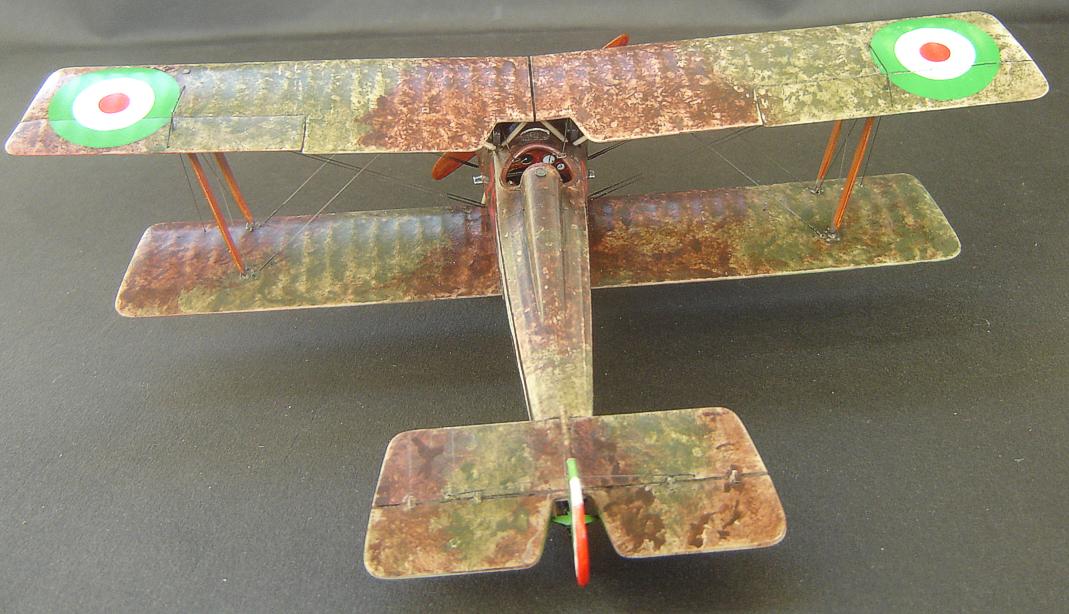
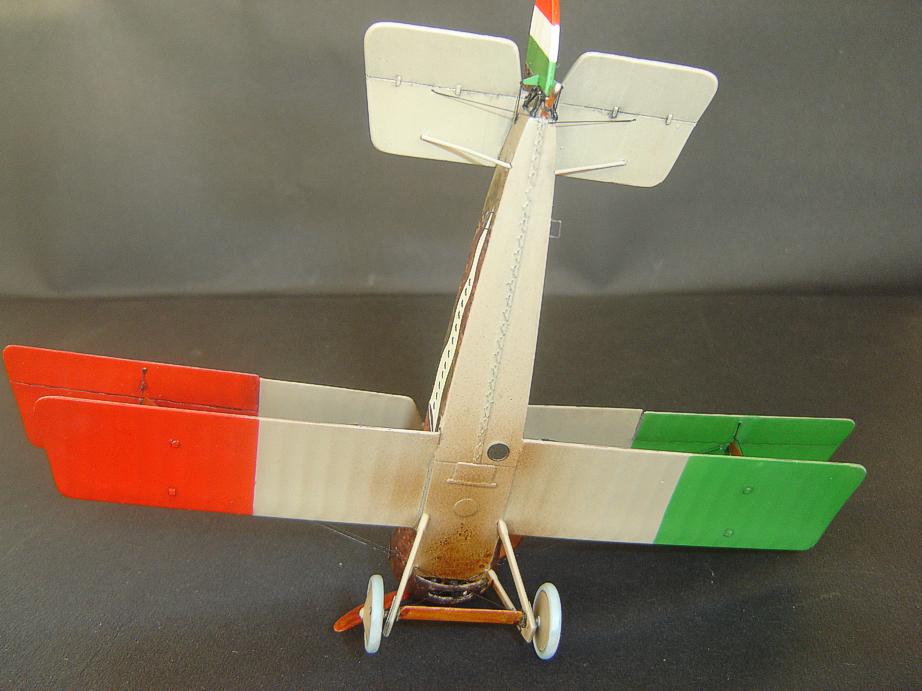
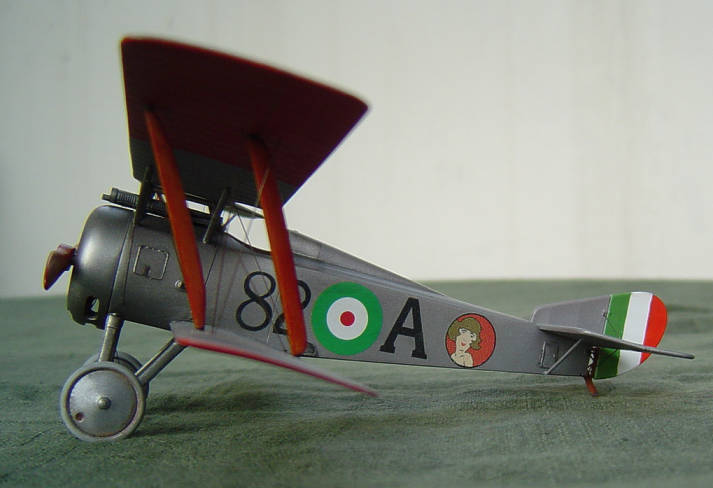
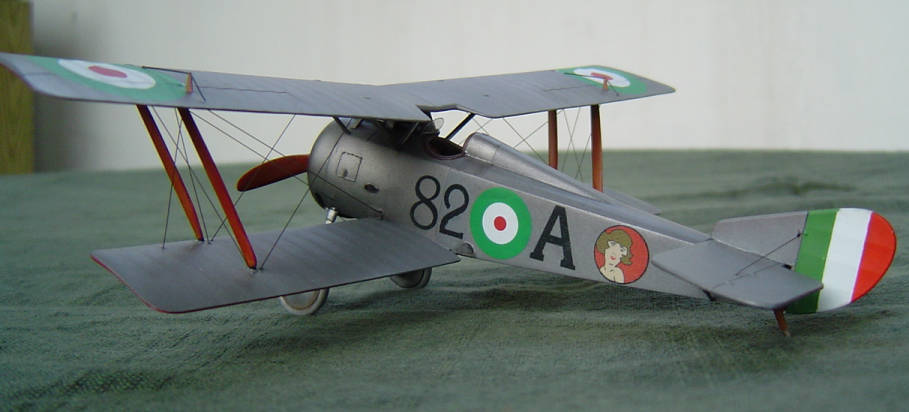
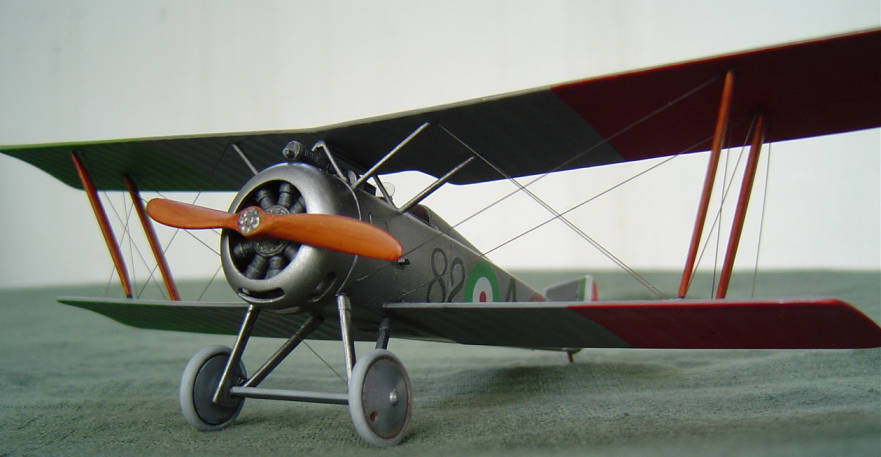
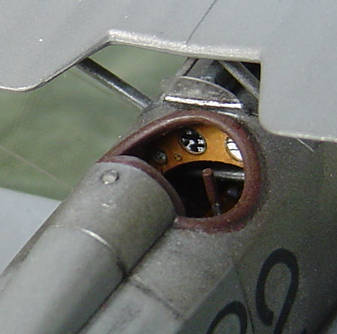
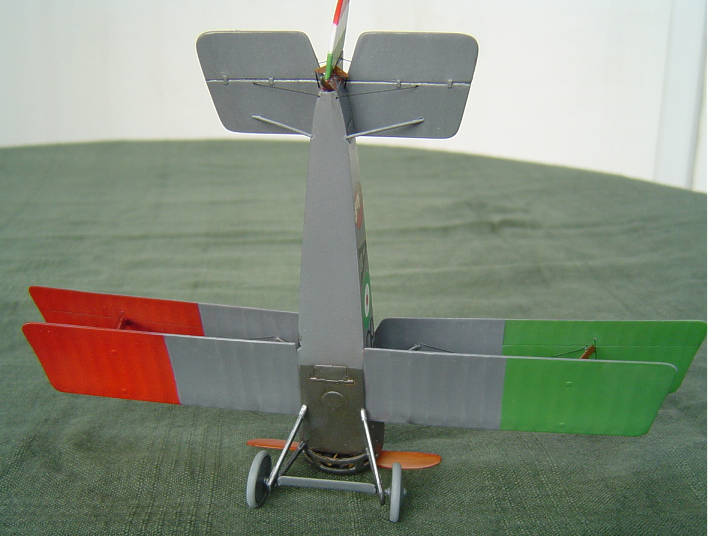
Eduard's Hanriot HD-1 is still a cool kit. 'In Italian Service' boxing contains some useful PE parts for the Italian built version of the type. You still have to scratch build some details, too, like the gap between fuselage and rudder, the missing cooling hole in the engine cowling etc. For the Italian version you have to fill one cooling hole, too, on the port side of the cowling! For this Mario Fucini's plane I also had to scratch the peculiar triangular thing, obviously a field modification, on the belt feeding side of the starboard Vickers gun. My interpretation of the camouflage is based on a photo in 'Italian Aces of World War I' by Gentilli, Iozzi and Varriale. The base colour is Citadel 'Kommando Khaki' and the camo colours are Scorched Brown and Catachan Green.
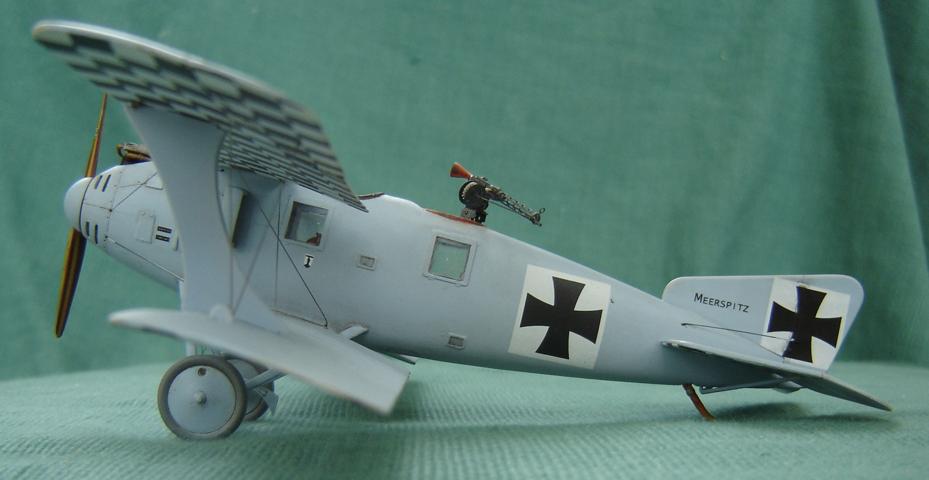
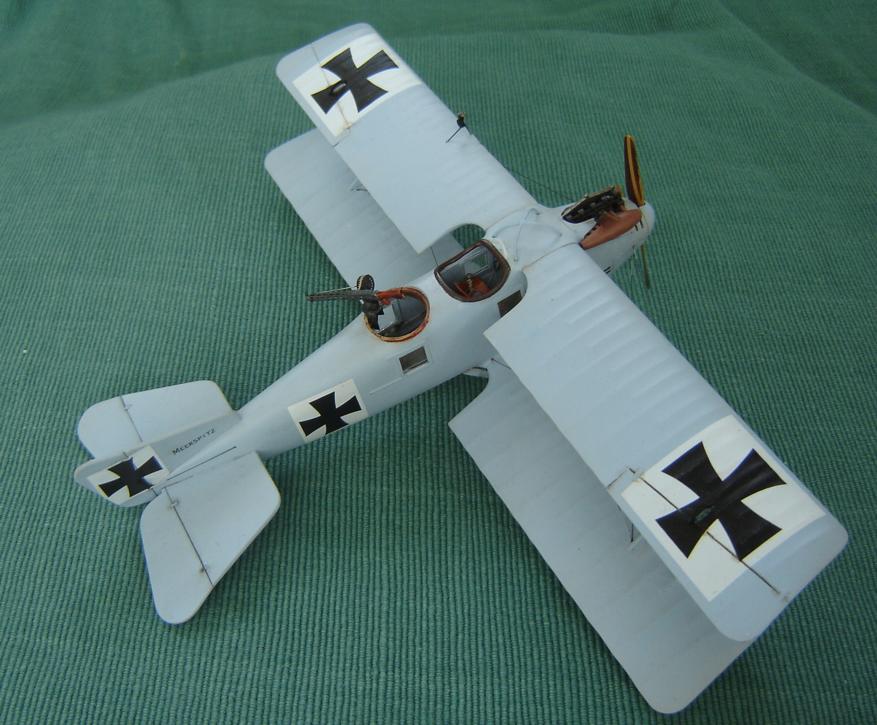
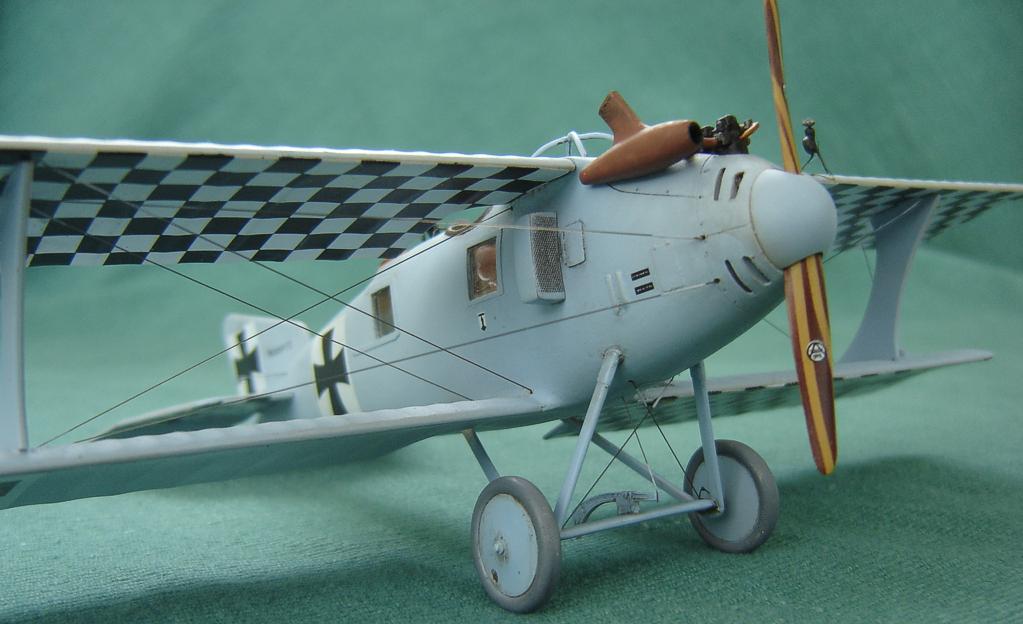
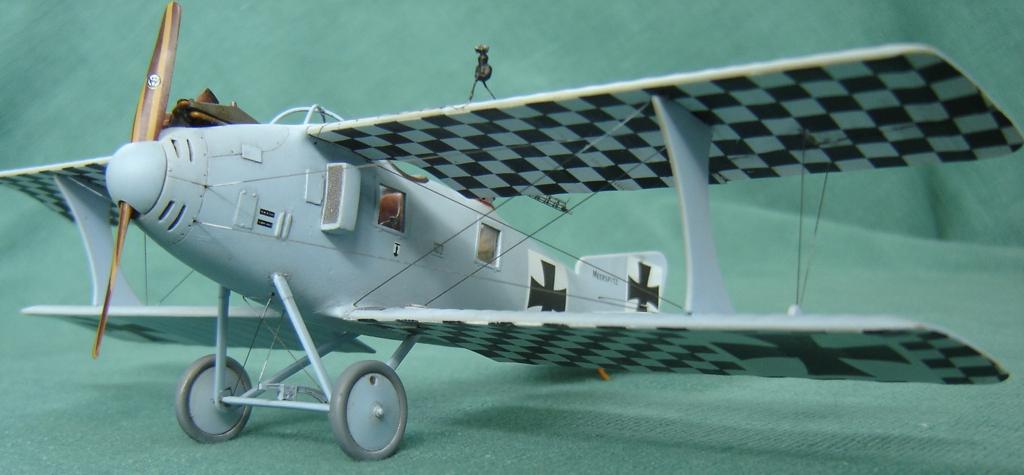
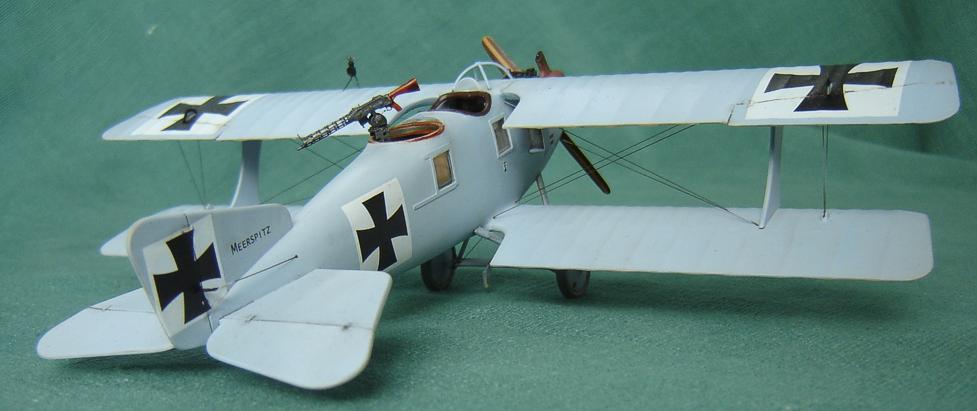
Roland C.II is one of the loveliest kits Eduard has made so far. This Special Edition boxing is not - however - such a hit. The decals for the famous
fish scale plane won't fit. Even on Eduard's own web site you'll find a build with too wide gaps between the "scales". This second option, "Meerspitz,
had also an unpleasant surprise waiting on the decal sheet. In the Roland C.II Windsock Datafile you'll find a photo of this bird with no checkerboard
motif painted on the underside of the lower starboard wing. The wing was probably replaced with a new one for some reason. The painting instructions of this Special Edition kit show also
the checkerboard under the port side lower wing only. And what do we get on the decal sheet? A checkerboard decal that fits under the starboard side lower wing! There's also a funny mistake
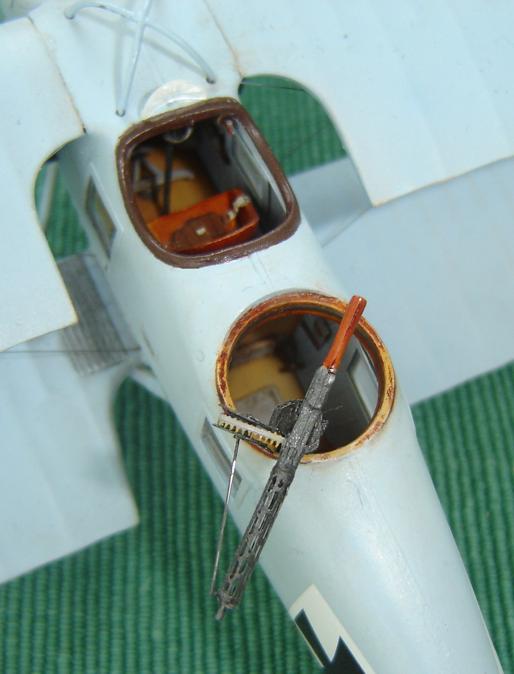
in the PE set. Most of the PE parts for the early production Roland C.II nose detail are in 1/72!
Well, the starboard side checkerboard decal was usable for the port wing, too. You just have to paint some squares to the tip and to the root of the wing. The nose details are easy to scratch and the rest of the PE parts, including the prepainted set, were of the usual high Eduard quality. So, the drawbacks were really nothing and this was a pleasant build altogether.
This is my second effort with Special Hobby's Spad kit and unfortunately it is not much better than the first one years ago (see the bottom of this page!). I did the rigging partly with .005 surgical wire, which bends easily with the lightest touch. I seem to have gotten same of those twisted while handling the model during the photo session.
Well, you can always put new wires, but the twisted upper wing is a more difficult thing! How on earth did I get it warped like that? Did I forgot it in the sun? How embarrassing! I managed to get a resin upper wing straight (see the Rumpler below!)and then get a plastic wing warped!
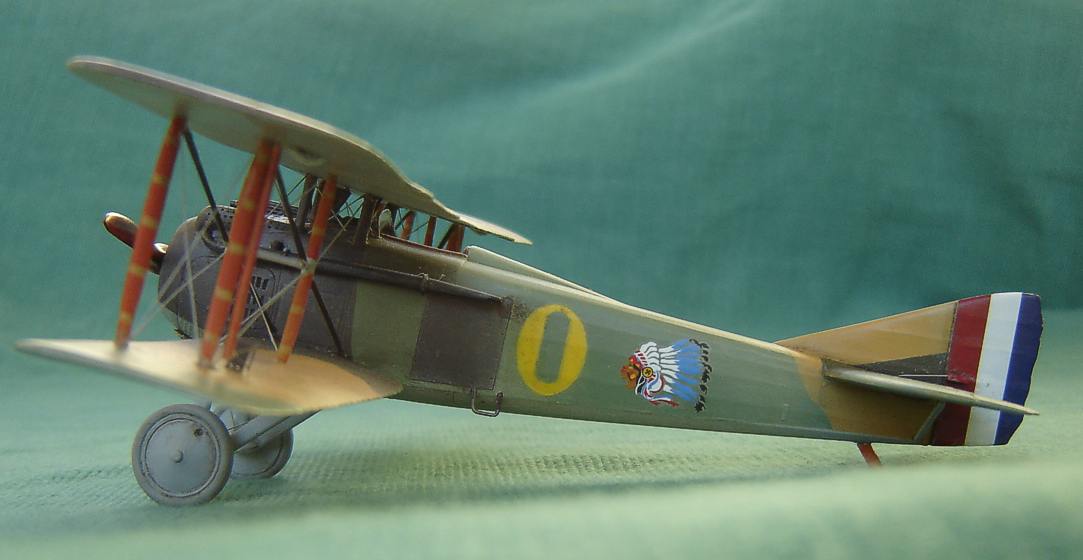
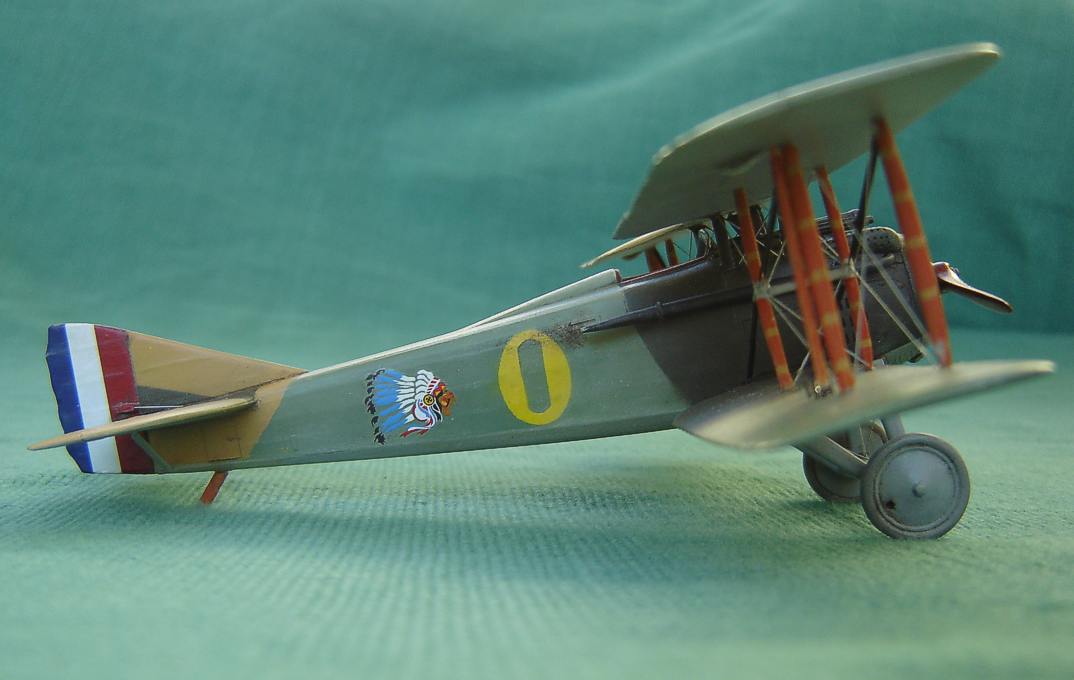
Special Hobby's team have studied very well the late De Marcay built SPAD VII in The Czech Aviation Museum in Kbely and their kit has quite a few details typical to these production batches of 1918 and later. If you want to build an accurate model out of the kit, the easiest way is to choose some scheme of a De Marcay built machine from the 7xxx, 11xxx or 20xxx series. The problem is, that the three different Special Hobby boxings have all together only one decal option for a late De Marcay built machine. That one is the Czechoslovakian machine in the kit number SH48031. So, if you want to have an easy build, you'll probably have to work more with the markings. But then again, the four colour zig zag camos of the late production De Marcay Spads are quite nice and worth the effort!I used the American roundels from the kit's own sheet - this is the SH48010 "Cpt. Biddle" boxing. The Indian heads were, however, too big, so I have to take the heads from an AeroMaster sheet. The yellow zeros I airbrushed using a self made mask.
This is supposed to be a model of Spad VII no. S 7276, in which Lt. Stuart Edgar of 103rd Squatron was killed in August 1918. There are some 'might-have-beens' in my scheme: Edgar was photographed in July in the cockpit of a De Marcay Spad with a presumably yellow zero and the famous Indian head insignia painted on the fuselage. This might have been S7276. The American tricolor might have been painted on the rudder, but that is not a sure thing either.
My first effort with an all resin kit. As one can expect, the long thin wings are a problem with a resin kit in this scale. The wings were warped and I had to use a lot of hot water and finally also tight fishing line rigging to straighten them. Originally the upper wing had been too straight, though. I had to saw deep grooves both sides of the upper wing gravity tank to bend the wings up in low angle like in a real Rumpler C.I. That was a bit of bluffing, since the angle should- of course - be in the center of the upper wing.
The rip tape detail areRoland C.II is one of the loveliest kits Eduard has made so far. This Special Edition boxing is not - however - such a hit. The decals for the famous fish scale plane won't fit. Even on Eduards own web site you'll find a build with too wide gaps between the "scales". This second option, "Meerspitz quite excessive and clumsy, but I did not sand them lower, since I was afraid to anything to the fragile wings that was not absolutely necessary. The thin and warped resin tail and fin were easy to replace with parts made out of plasticard. The landing gear struts were of strengthened resin and usable. The interplane struts I made out of Aeroclub Struts. The fuselage, engine, cockpit etc. parts were quite good and there were even a PE set for extra details. I added an instrument panel in the cockpit, though I'm not 100% sure that there were one in Rumpler C.Is.
The decal sheet is very nice including two options. With the kit you'll get also some alternative parts for these options like two different exhaust pipes etc. There is also an extra Parabellum mg to be mounted on the top wing of this Flieger Abtailung 7 plane. There is a photo of such an aeroplane on page 36 in Windsock Datafile 79: Rumpler C.I. My model is based, however, on the photo on the page 35 presenting an aircraft with a machine gun bracket on the centre section struts, but no gun there. I chose this option, because I did not know, whether these planes ever had two parabellums and a Spandau on the nose at the same time.
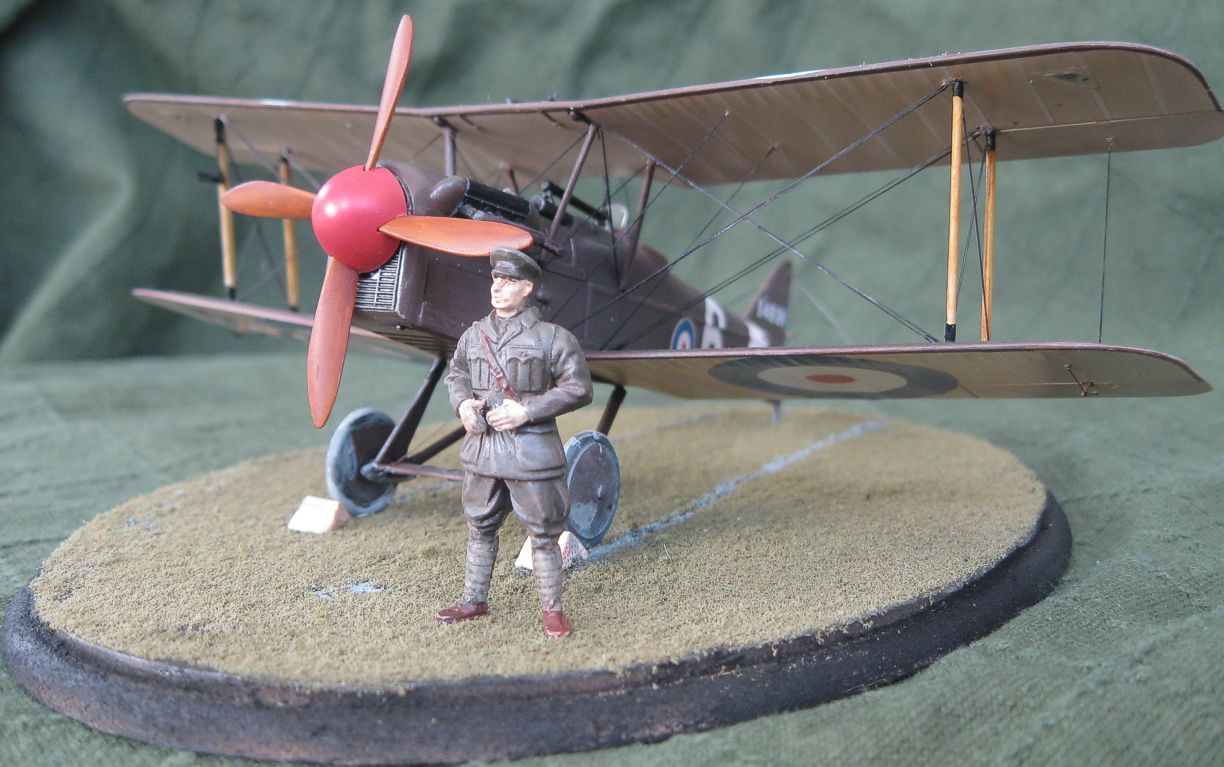
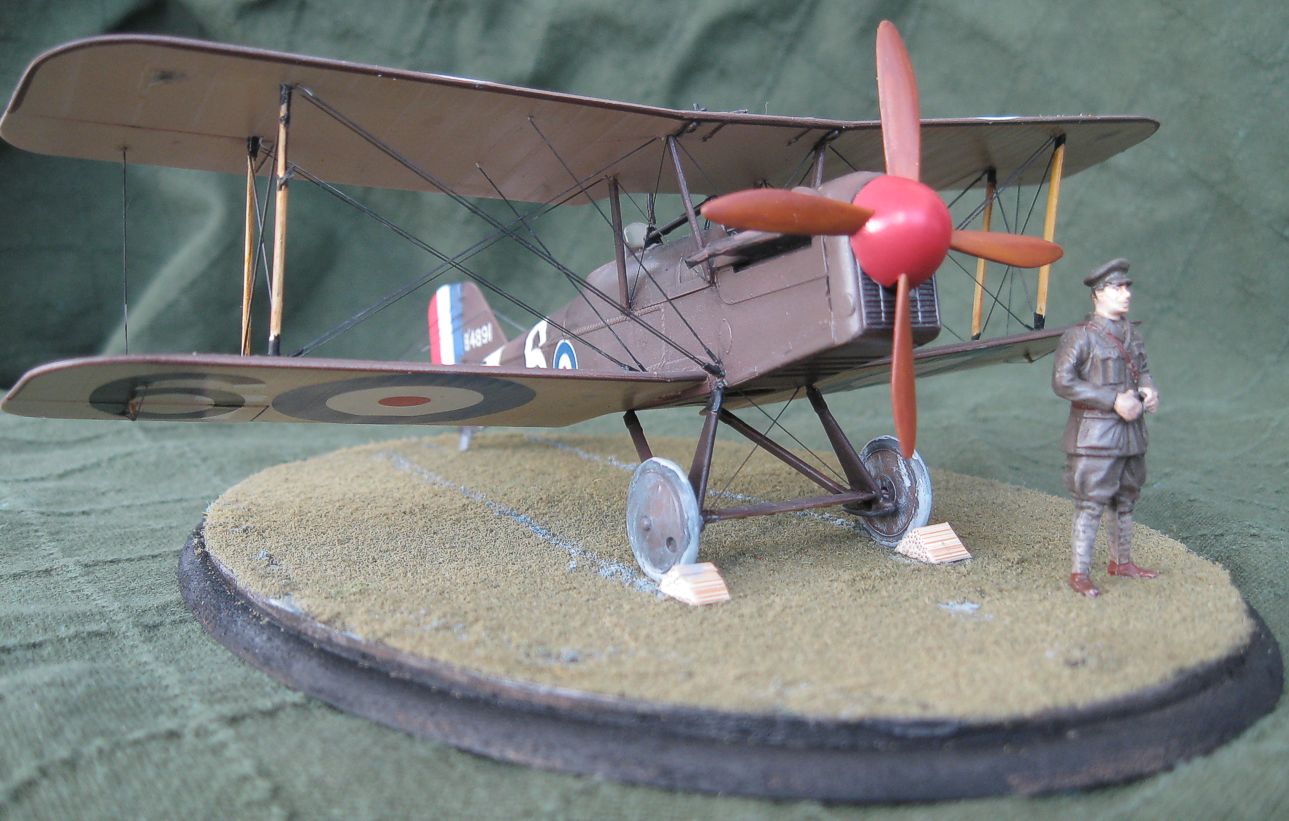
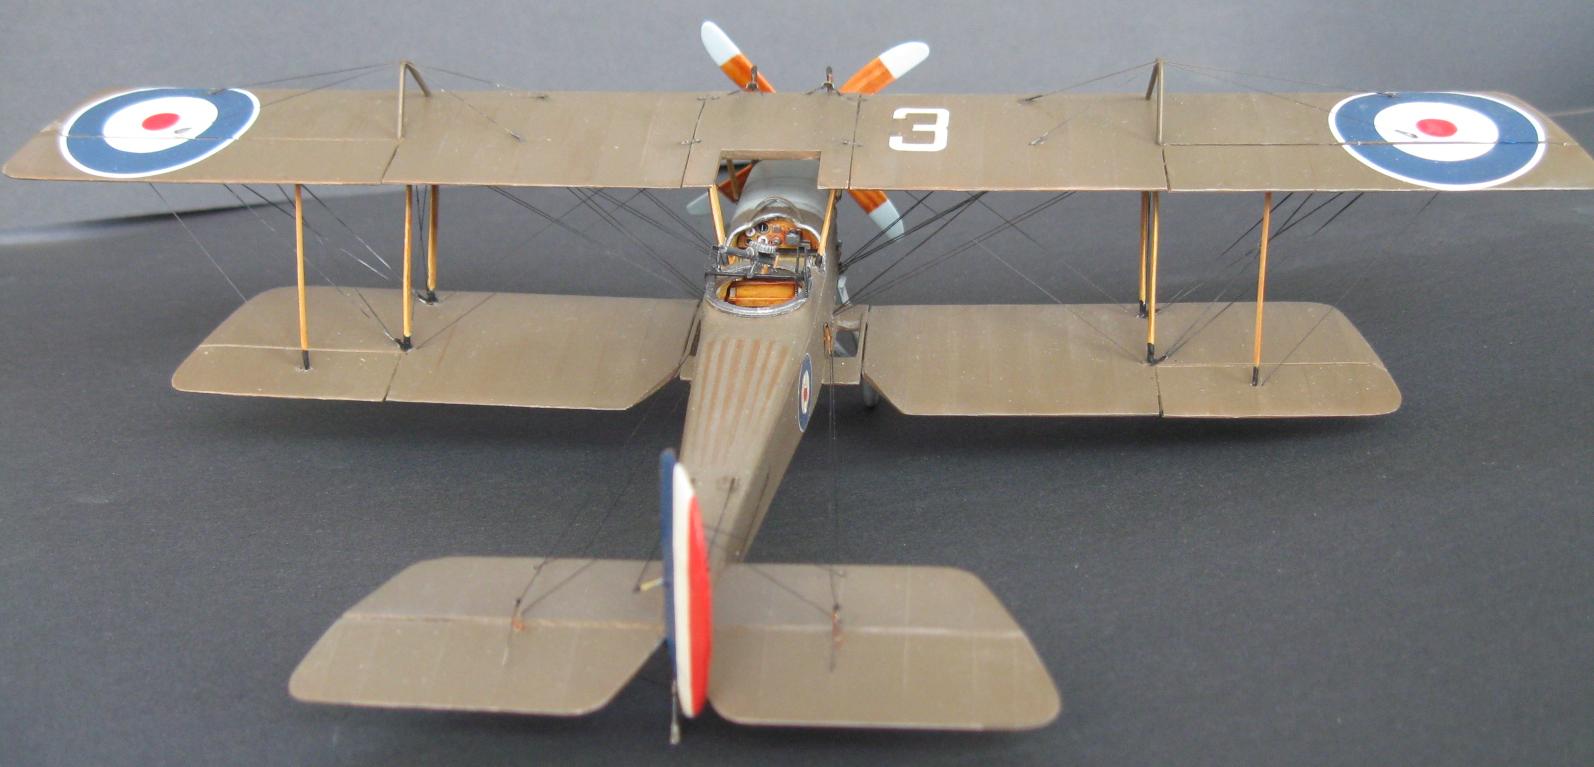
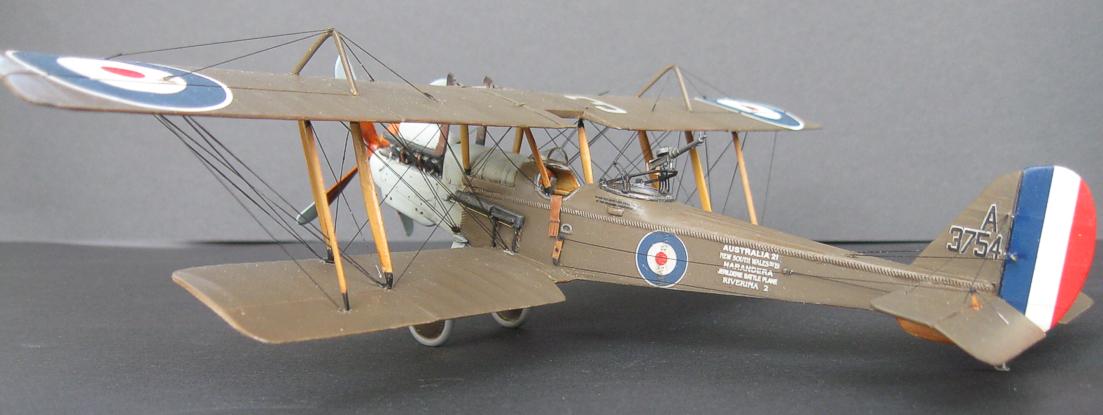
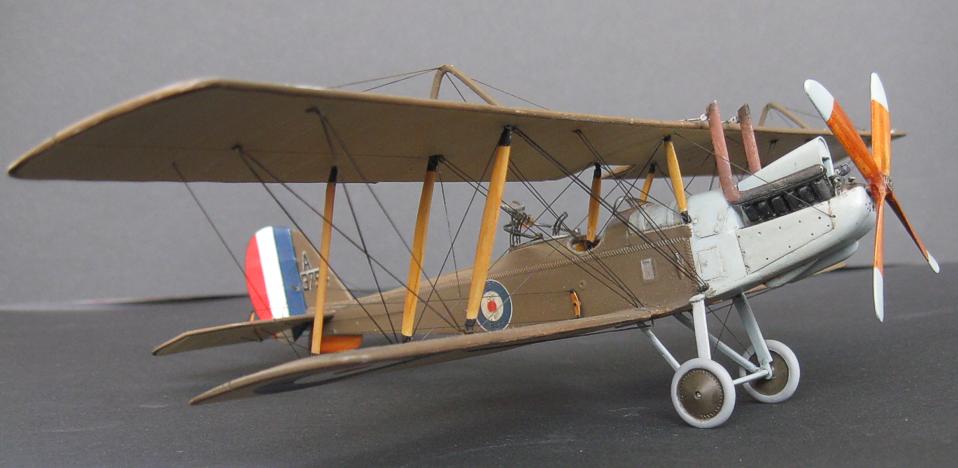
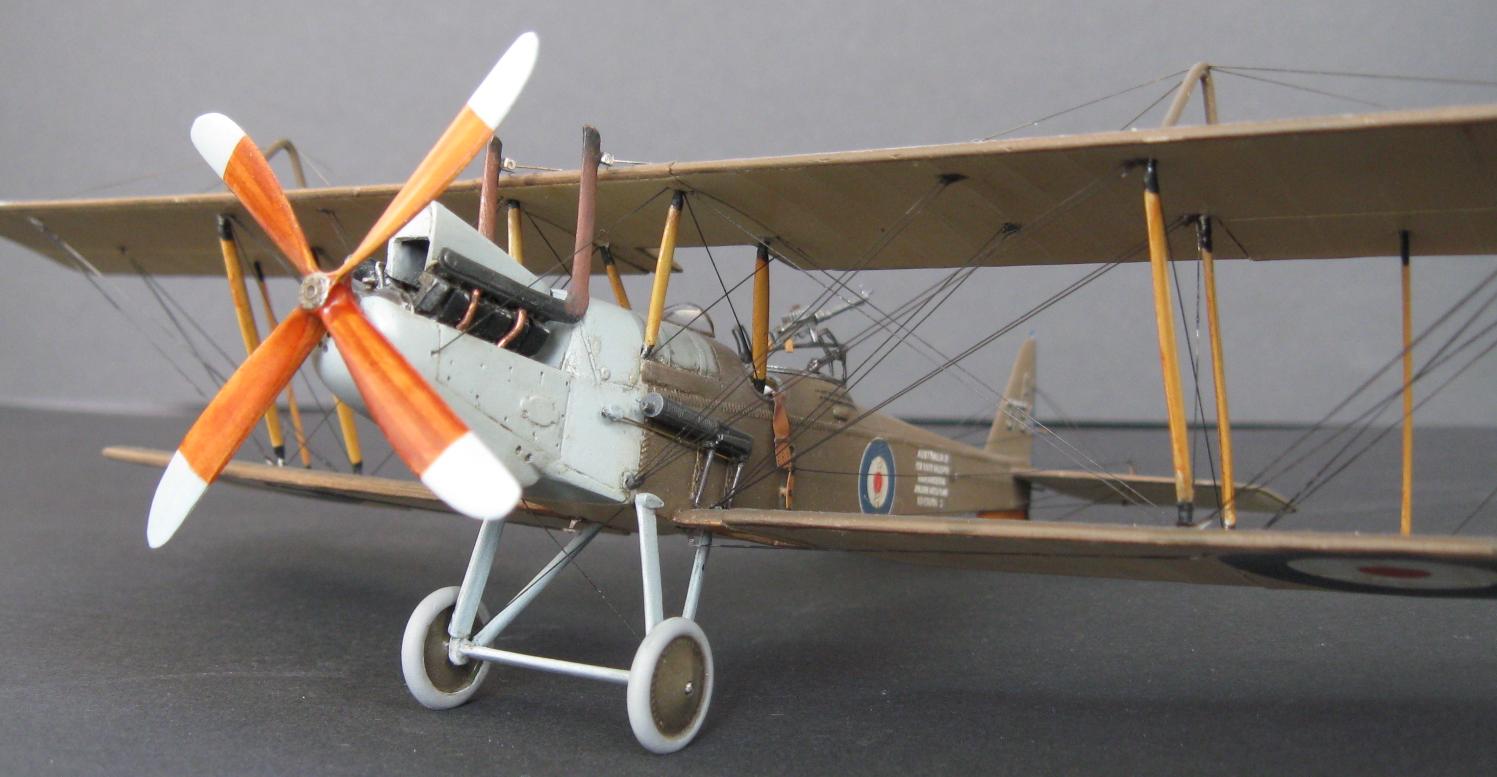
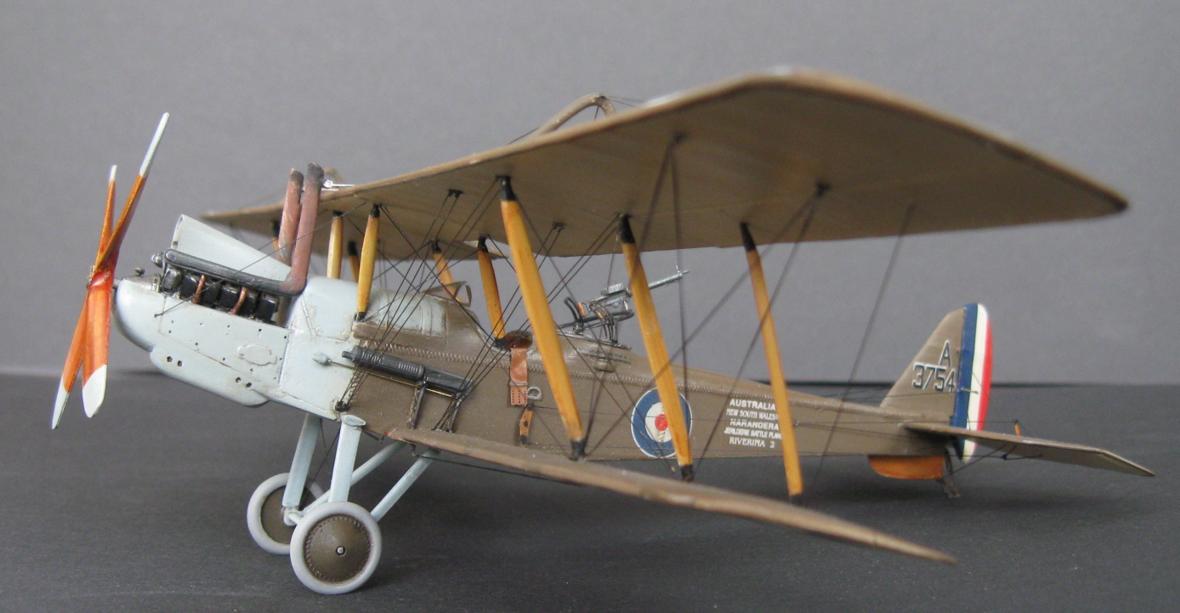
Very accurate and nice kit. Roden even sent me a new lower wing for it! With its multi-part fuselage and lots of rigging it was a bit more challenging build than the usual Eduard kits I do. This was a bit of a rehearsal. I'm sure going to build some more, at least the Hisso version! Details are mostly fine. I only detailed the triangle see-trough inspection panels on the wings and tail and changed the solid triangle exhaust pipe and tube sight holders to v-shaped ones. Wing details are otherwise nice and accurate, but I really miss some rib tape details on them. Next time I should make something about it! The decals are from the Americal/Gryphon sheet 145.


The upper wing of this kit was really a disappointment! The tips curve up quite a lot. The real Phönix D.I upper wing was straight. Only the trailing edges of the ailerons curved up. It might be possible to fix the wing, but I'm too lazy and clumsy to do that. Special Hobby's Phönix D.II kit has an upper wing that looks much more accurate. It will be interesting to see, if the strut parts fit with that wing, because they certainly did not fit with this one! The both kits have the same parts for struts. I made a compromise with the struts. I added some length to the interplane struts and scratched the cabane struts. Due to the compromise the upper wing is way too close to the fuselage.
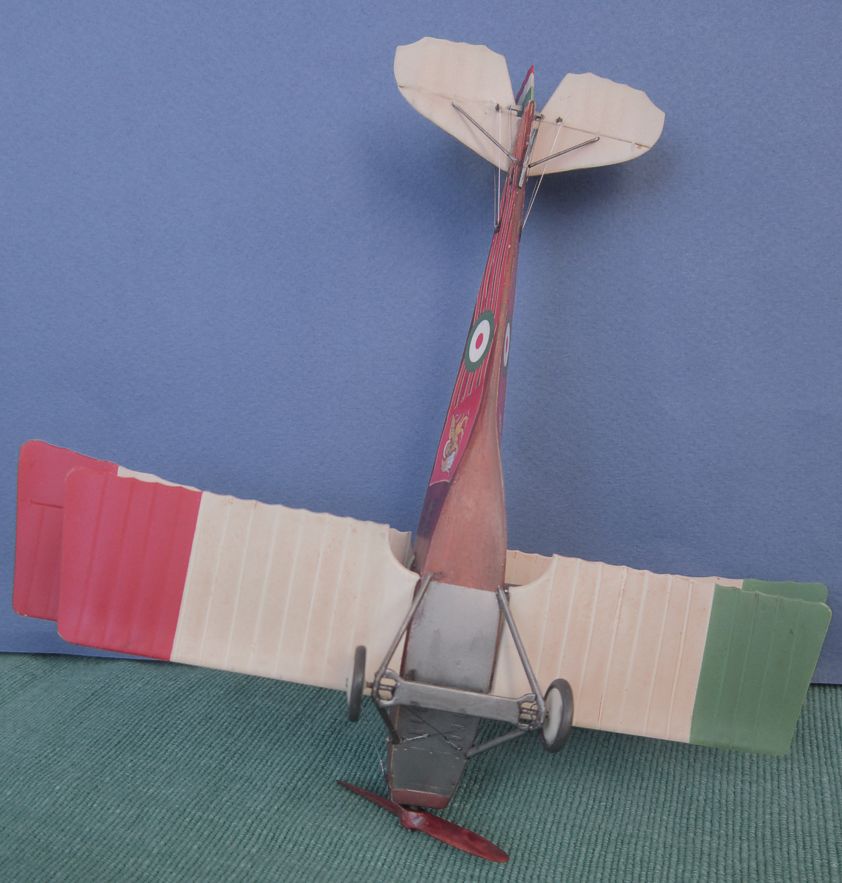
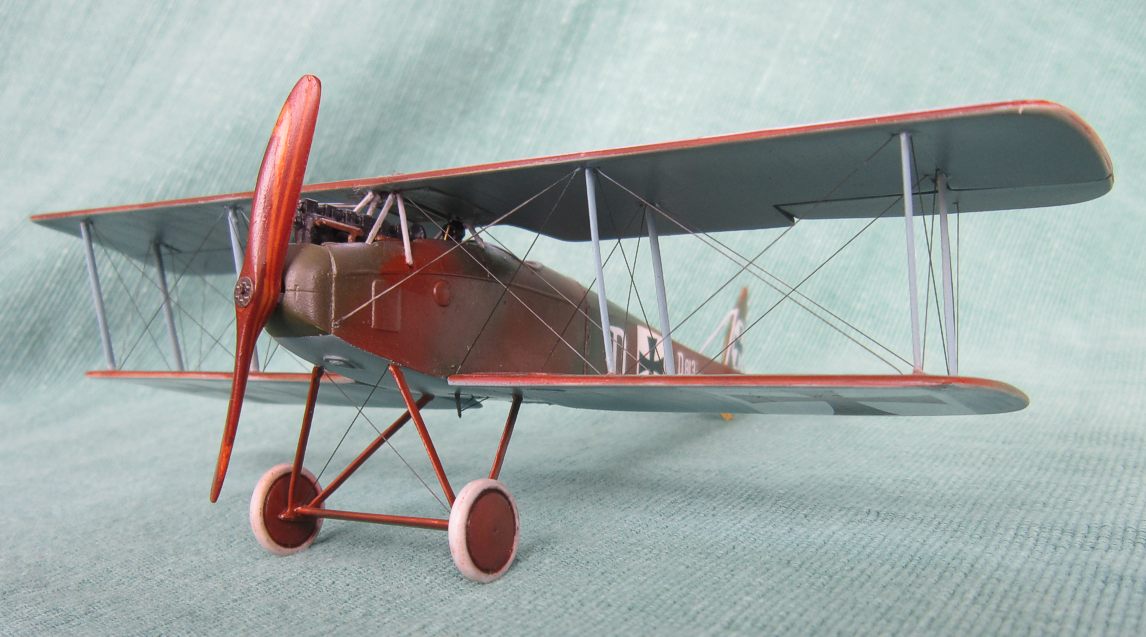
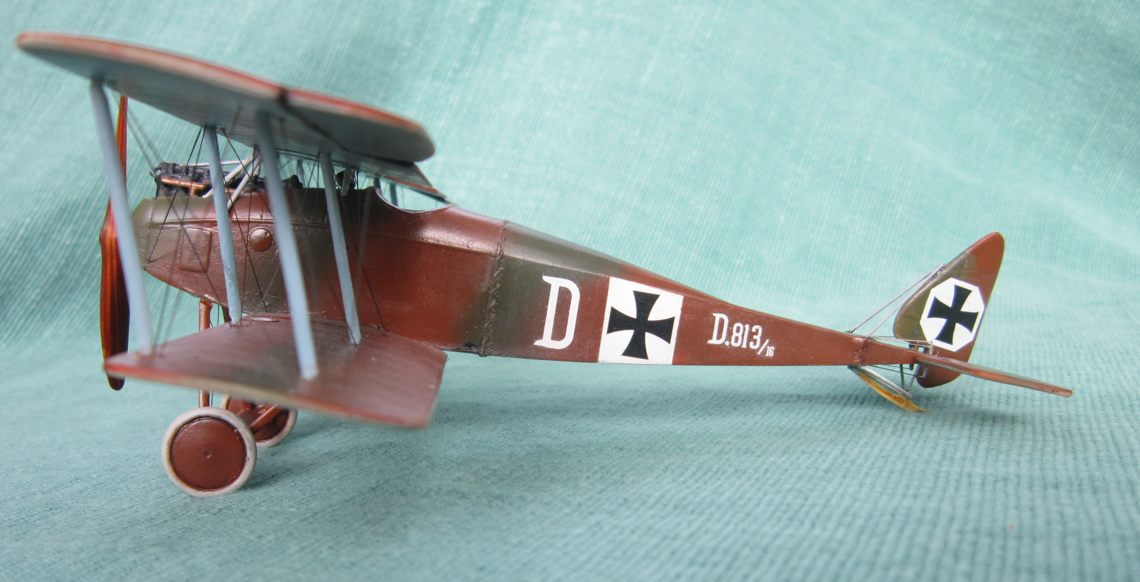
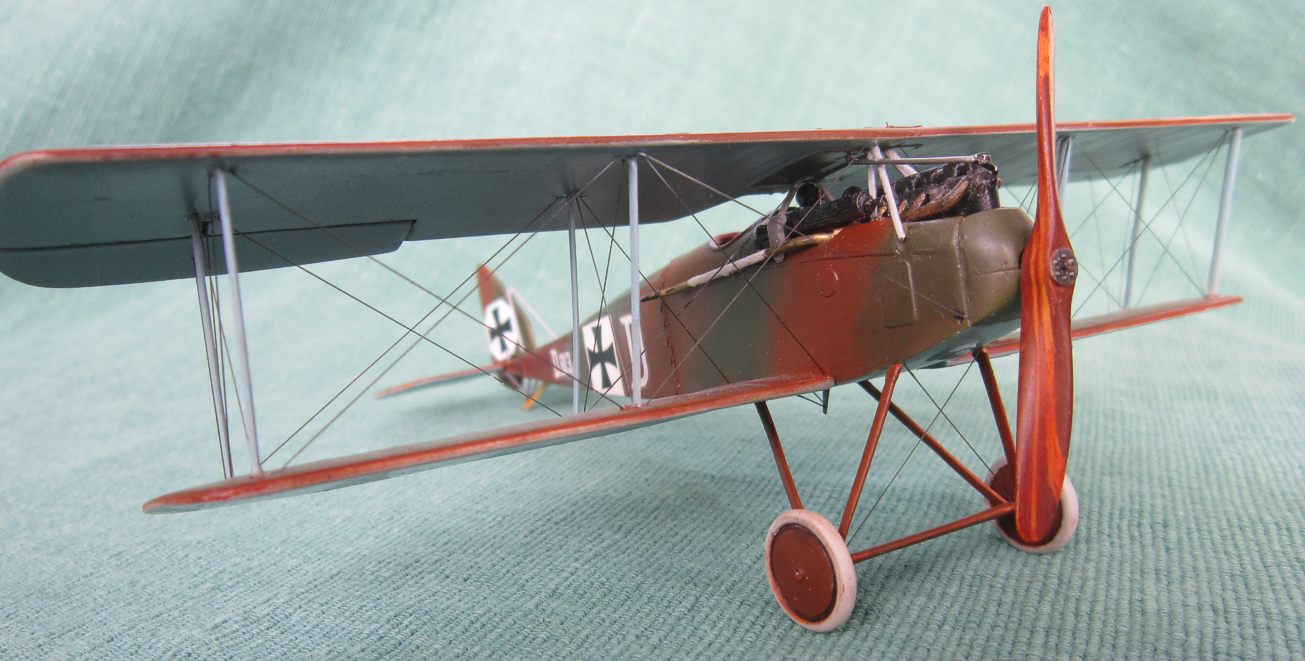
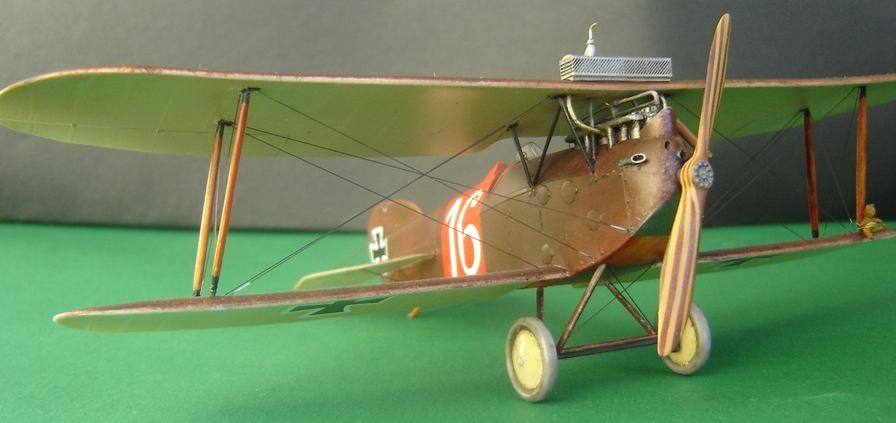
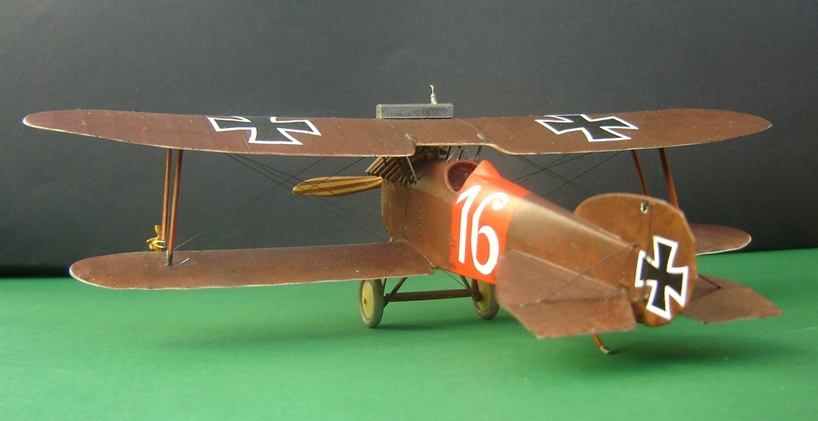
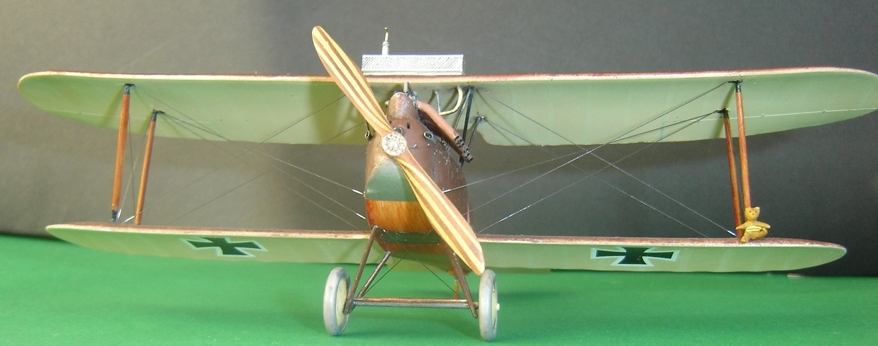
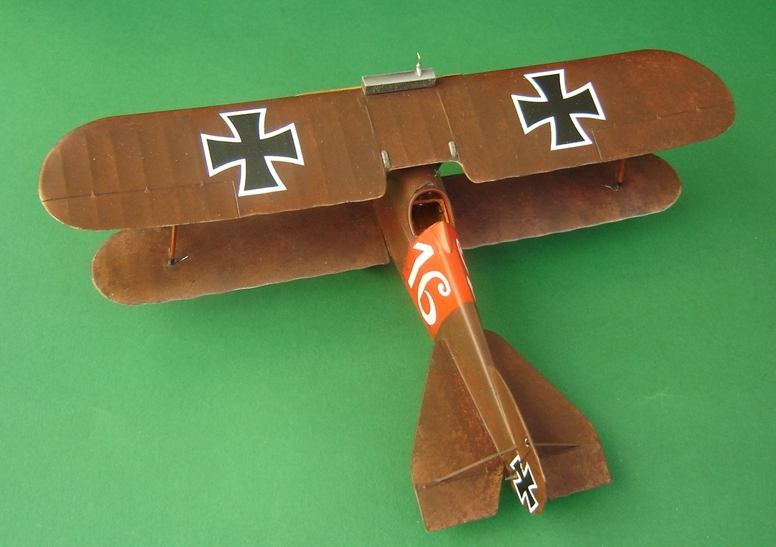
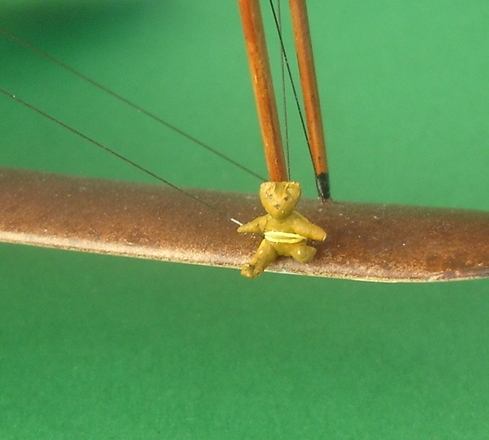
Otherwise a nice model. There are lots of details missing, but most of them are easy and fun to scratch. My additions include the inner cabane struts, water pipes to the radiator, one round acces panel on the port side of the nose, the big rectangular acces panel on the underside of the fuselage, the wooden plate between the fuselage and the tail skid, quite a few details to the cockpit and, of course, the teddy bear, which was a personal talisman of Oblt. Rudolf Schultais of Flik 16D. The '16s' on the fuselage sides are from A/G sheet No. 72 and the rest of the decals from the kit's sheet. I used Citadel 'Scorched Brown' for the mottled camo.
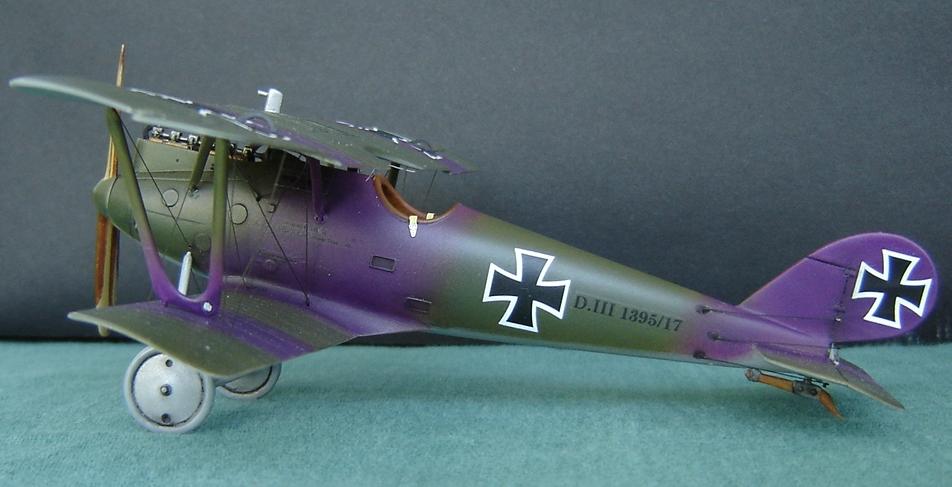
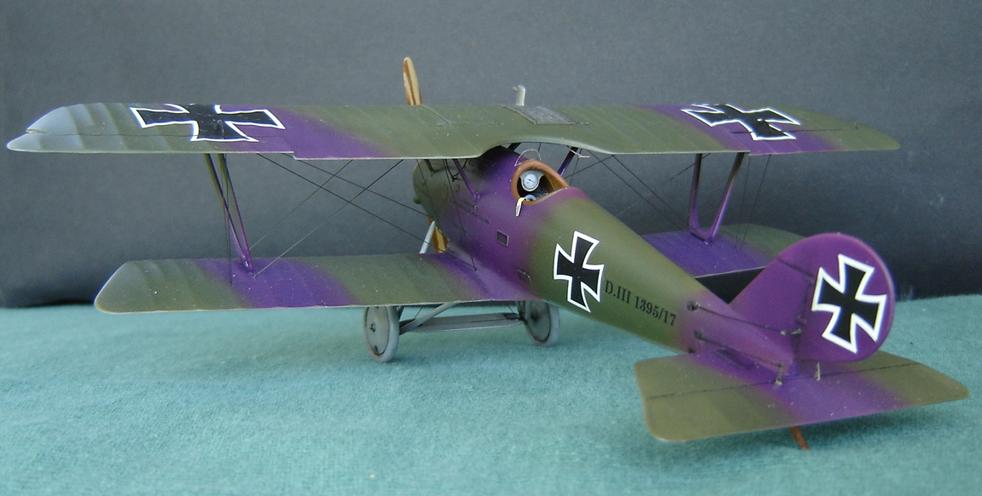
Very nice and accurate older kit from Eduard. Out of production at the moment, but I've heard that it will be re-released as an improved version in the future. This one surely deserves to be re-released. Very straightforward and pleasant build. I only added few details, most notable of which are the water pipes between the wing radiator and engine and the pipes from the wing gravity tank to the fuselage. There is no decal option for a camouflaged plane, so I had to make the decals for the serials on the fuselage myself. The Bare Metal & Foil ink jet printable decal sheets available here in Finland are rather thick stuff and do not react much to solvents, not to Micro Sol at least. The thickness of the decal is unfortunately slightly visible. That's why I did not bother to make smaller serials to the struts. Painted with Citadel Acrylics. The underside 'Silbergrau' is 1/1 mix of Fortress Grey and Mithril Silver, the camo colours are Liche Purple and Catachan Green. This is supposed to be a model of a camouflaged Pfalz that Jasta 10 future ace Aloys Heldman flew in September 1917.

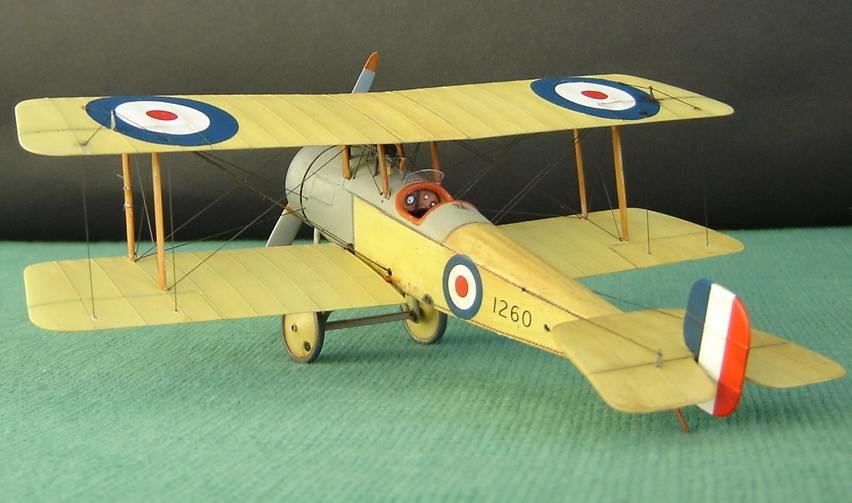

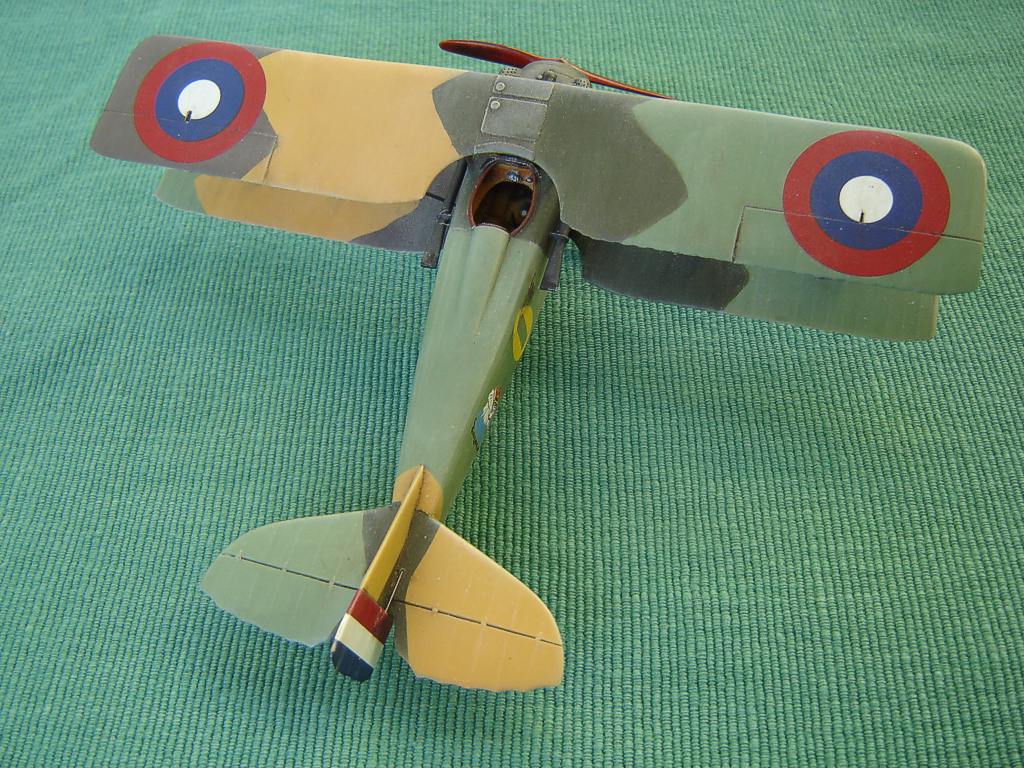
Gavia is a tiny company leasing Eduard's production tools and they're kits are very 'Eduardish', i.e. attractive. The level of accuracy is not, however, quite the same as in Eduard's and Roden's kits. Not yet, at least. I'm sure they'll do better in the future. The 'mistakes' of Gavia's Bristol Scout C kit are not that dramatic really - many modelers have done very nice builds OOB! - but there are a few. The kit offers the larger horizontal tail of the late production Scouts, but it has the fuselage of the early production planes with the oil tank rear of the cockpit. Both features are quite easy to correct depending on which model you want to build. Harder to fix is the engine cowling, which is a bit too small in diameter. I did not do anything to it, though I do think the mistake can be seen in the general appearance of the model. Some minor faults in detailing include wrongly shaped acces panels both sides of the nose and the lack of rear fuselage lacing. I did not mind the acces panels - they are nicely detailed anyway - and I detailed the lacing with home made decals.
The kit offers a non-standard Lewis gun and for this very bird, Scout C # 1260, a PE mounting for it. Both are accurately copied from a close shot photograph of a RNAS Scout. Unfortunately the Scout in the photo is not # 1260! I copied this mounting from a photo taken of 1260 while in the use of 5th Naval Wing in the Summer 1915. For the Lewis I used a surplus Eduard part. The mounting is of ' closest-thing-to-Kamikaze style' with the mg shooting trough the propellers arc with apparently no synchronizing or deflector mechanism! Some other Scots with same kind of Lewis mounting had fabric tape around the propeller, apparently to protect the airscrew to go all pieces when hit. I assumed that this plane might have had the same kind of 'protection system'.
The decals of the kit are of very good quality, but they're not quite accurate. The roundels and numbers for fuselage sides are too big. The sheet lacks a second pair of roundels for wings, though 1260 certainly had roundels on the top wings too. There is, however, roundels with white lining for a PC10 painted option. I cut the whites out and managed to get something amazingly round for the lower wing roundels. I seem to find a lot of mistakes from this kit, but never mind my whining! It's a nice and highly recommended kit!
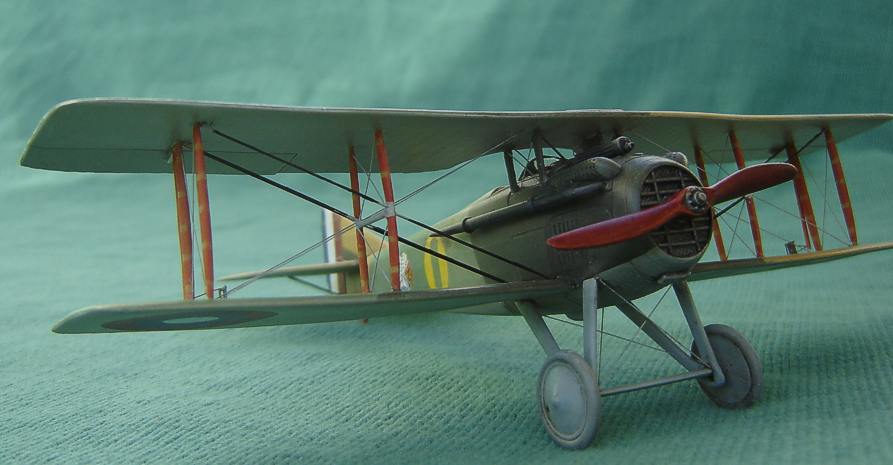
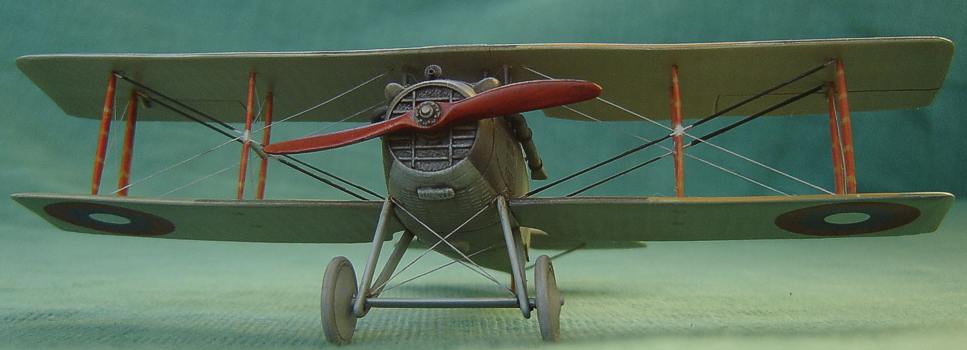
Czech label Special Hobby has put out their first ventures on the field of ww1 modeling. SPAD VII in 1/48 is without a doubt more than welcome all over the ww1 modeling world! It comes in two different boxes, one with decals for French aces Guynemer and Lenoir and Italian Fulco Ruffo, the other one with American and British marking. I reckon that the only difference between the versions is the decal sheet. Mine is the Franco-Italian version, with decal options for early production SPAD VIIs (not sure about Ruffo). There is - however - almost all necessary for the later production versions in the box too. The vertical radiator shutter is missing thought. I wonder if it's included in the American-British version. There you'll need it! The drop shaped parts of the engine covering should come a bit more over the radiator cowling, shouldn't they? The pipes and/or their covering from the fuselage to the upper wing tank are missing, so you have to scratch build them. There is a big access panel on the left side of the fuselage right behind the cockpit. Never seen one in any photo of SPAD VIIs, so I hide it. Otherwise very accurate model. Plastic parts are of reasonable quality - thought still far away from Eduard's elegance - the resin cockpit is nice and the PE parts are good. 'A challenging model for more advanced modelers' i.e. beastly difficult to put together! The decal sheet is basically OK, but the red colour is very dark, almost brownish. I rather used Aero Master's beautiful Franco-Italian Aces sheet. I probably would have used it anyway, since I've always wanted to have one of Spa 48's "Cockerel SPADs". This is Jean Roques' machine.